Mazda CX-5 Service & Repair Manual: Liftgate Latch Switch Inspection
1. Disconnect the negative battery cable..
2. Remove the following parts:
a. Liftgate upper trim.
b. Liftgate side trim.
c. Liftgate lower trim.
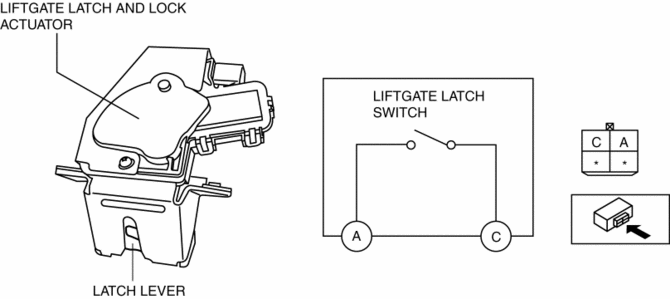
d. Liftgate latch and lock actuator.
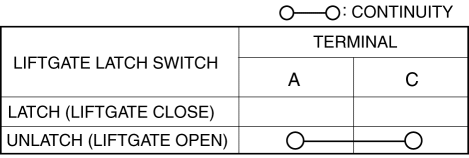
3. Verify that the continuity is as indicated in the table.
-
If not as indicated in the table, replace the liftgate latch and lock actuator.
NOTE:
-
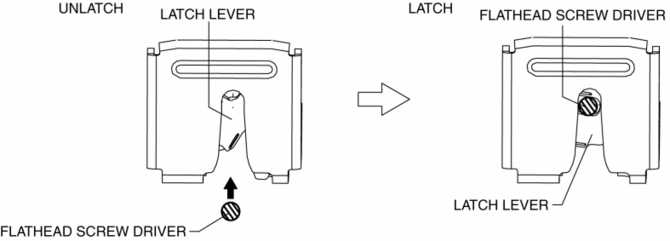
When inspecting the latch condition of the liftgate latch switch, press in the latch lever using a flathead screwdriver and set it to the latched position.
 Liftgate Latch Switch
Purpose, Function
The switch turns on/off in conjunction with the rotation of the latch lever,
and it detects the open/closed condition of the liftgate by the voltage value
which is chang ...
 Liftgate Light
Purpose
The liftgate lights are used to signal the following conditions to vehicles/people
at the rear.
Back-up lights: Signals that the vehicle is backing up.
Tailli ...
Other materials:
Check Valve Inspection
Except U.S.A. And CANADA
1. Remove the check valve..
2. Verify that there is no airflow when positive pressure is applied to port
A.
If there is airflow, replace the check valve..
3. Verify that there is no airflow when negative pressure is applied to port
A.
If ther ...
Car Navigation System Does Not Operation [Car Navigation System]
Possible DTC
Even if the map screen is touched, the car-navigation system cannot be
operated
POSSIBLE CAUSE
Audio unit malfunction (bad LCD panel)
Car-navigation unit malfunction
Diagnosti ...
Accelerator Pedal Position (App) Sensor
Purpose/Function
Detects the accelerator pedal depression amount as basic information for
mainly determining the throttle valve opening.
Detects the accelerator pedal depression amount and inputs it to the PCM
as an accelerator pedal opening angle signal.
Construction
...
