Mazda CX-5 Service & Repair Manual: Extractor Chamber Removal/Installation
1. Disconnect the negative battery cable..
2. Remove the following parts:
a. Rear splash shield.
b. Rear combination light.
c. Rear bumper.
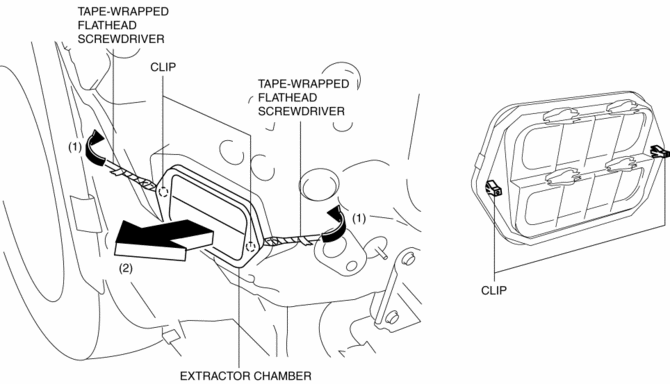
3. Insert a tape-wrapped flathead screwdriver shown in the figure and remove clips in the direction of arrow (1).

4. Remove the extractor chamber in the direction of arrow (2).
5. Install in the reverse order of removal.
 Exterior Trim
Outline
Exterior is equipped with the under cover on the vehicles under-surface.
Structure View
...
 Floor Side Panel Installation [Panel Replacement]
Symbol Mark
Installation Procedure
1. When installing new parts, measure and adjust the body as necessary to conform
with standard dimensions.
2. Drill holes for the plug welding before inst ...
Other materials:
Rear Stabilizer Control Link Inspection
1. Remove the rear stabilizer control link..
2. Inspect for bending or damage. If there is any malfunction, replace the rear
stabilizer control link.
3. Rotate the ball joint stud 10 times and shake it side to side 10
times.
4. Measure the ball-joint rotational torque using an Allen wrench ...
Windshield Washer Nozzle Removal/Installation
1. Remove the following parts:
a. Windshield wiper arm and blade.
b. Cowl grille.
2. Disconnect the windshield washer hose from the windshield washer nozzle..
3. While pressing windshield washer nozzle tabs in the direction of the arrow
(1) shown in the figure, pull the windshield washer ...
Planetary Gear [Fw6 A EL, Fw6 Ax EL]
Purpose/Function
The planetary gear is a mechanism which shifts the drive force from the engine.
The planetary gear consists of multiple gears which rotate individually while
revolving. By controlling the individual rotation and revolving of the gears,
the transaxle performs gear shi ...
