Mazda CX-5 Service & Repair Manual: Condenser
Purpose
-
The condenser cools the high-temperature, highly pressurized refrigerant.
Function
-
The condenser cools the high-temperature, highly pressurized gaseous refrigerant compressed by the A/C compressor using the outside air, and changes it to liquid refrigerant.
Construction
-
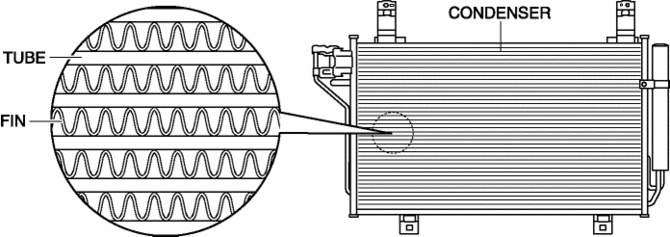
The condenser is installed to the front of the radiator.
-
The condenser consists of the tube which passes refrigerant, and the heat radiation fin.
-
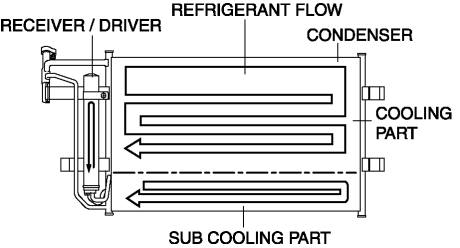
A sub-cooling condenser has been adopted.
-
The sub-cooling condenser is integrated with the multi-flow condenser and the receiver driver.
-
The sub-cooling condenser separates the refrigerant, cooled once by the condenser, into vapor and liquid using the receiver/drier, and by returning it to the sub-cooling part of the condenser again to cool.
-
As a result, liquefaction of the refrigerant is promoted and cooling performance is improved.
Operation
-
The high-temperature, highly pressurized gaseous refrigerant sent from the A/C compressor passes through the tube in the condenser.
-
When the air blown from the outside is exposed to the heat radiation fin, the heat of the refrigerant is captured by heat exchange, and the refrigerant changes from a gas to a liquid.
-
The liquid refrigerant is sent to the expansion valve via the receiver/drier.
Fail-safe
-
Function not equipped.
 Climate Control Unit [Manual Air Conditioner]
Purpose
The climate control unit performs air conditioning according to the operation
by the users and the driving conditions of the vehicle.
Function
The climate control unit d ...
 Condenser Inspection
1. Inspect the condenser for cracks, damage, and oil leakage.
If there is any malfunction, replace the condenser.
2. Visually inspect for bent fins for clogging of foreign material.
...
Other materials:
Splash Shield Removal/Installation
Front
Front splash shield No.1
1. Set the mudguard aside..
2. Remove fasteners A.
3. Remove the front splash shield No.1.
4. Install in the reverse order of removal.
Front splash shield No.2
1. Remove screw B.
2. Remove fasteners C.
3. Remove the front splash shield No.2.
4. ...
Limitations to SRS Air Bag
In severe collisions such as those described previously in “SRS Air Bag Deployment
Criteria”, the applicable SRS air bag equipment will deploy. However, in some accidents,
the equipment may not deploy depending on the type of collision and its severity.
Limitations to front/near front colli ...
Instrument Cluster Inspection
Speedometer inspection
Using a speedometer tester
1. Adjust the tire pressure to the specification.
2. Using a speedometer tester, verify that the tester reading is as indicated
in the following table. km/h
Speedometer tester indication (km/h)
Allowable rang ...
