Mazda CX-5 Service & Repair Manual: Awd Control Module Removal/Installation
CAUTION:
-
When performing configuration, it is necessary to read the coupling component calibration data from the AWD control module before replacing it. Connect the M-MDS to the vehicle and perform vehicle identification before removing the AWD control module. The coupling component calibration data is temporarily stored in the M-MDS.
-
If the configuration was not performed after replacing with a new AWD control module, the following conditions can be considered as occurring because the coupling component calibration data was not recorded in the AWD control module.
-
System does not operate normally.
-
Problem with coupling component durability may occur.
NOTE:
-
The AWD control module prior to replacement stores the coupling component calibration data.
-
If coupling component calibration data from the AWD control module prior to replacement cannot be read, perform the coupling component calibration data writing..
1. When replacing the AWD control module, perform the configuration..
2. Disconnect the negative battery cable..
3. Remove the front scuff plate..
4. Remove the front side trim..
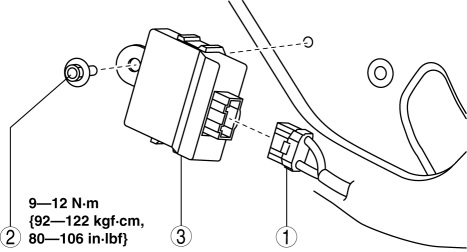
|
1 |
Connector |
|
2 |
Bolt |
|
3 |
AWD control module (See AWD Control module Removal Note.) |
5. Remove in the order indicated in the table.
6. Install in the reverse order of removal.
NOTE:
-
If configuration cannot be performed by reading/writing of the coupling component calibration data, perform the coupling component calibration data writing..
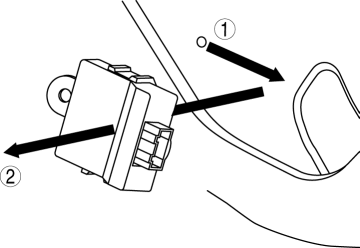
AWD Control module Removal Note
1. Slide the AWD control module toward the connector, and remove it.
 Awd Control Module Inspection
NOTE:
AWD CM terminal voltage can vary depending on measuring conditions and vehicle
aging, resulting in misdiagnosis. Therefore, it is necessary to perform an overall
inspection of the ...
 Awd Solenoid Inspection
1. Disconnect the negative battery cable.
2. Disconnect the AWD solenoid connector.
3. Measure resistance between AWD solenoid connector terminals A and B.
If the resistance is not wit ...
Other materials:
Airflow Mode Actuator Inspection [Full Auto Air Conditioner]
CAUTION:
If the lever position exceeds the operation range shown in the figure, the
circuit in the actuator could be damaged. Always perform an actuator operation
inspection with the lever movement within the range shown in the figure.
1. Connect battery positive voltage to airfl ...
Condenser Inspection
1. Inspect the condenser for cracks, damage, and oil leakage.
If there is any malfunction, replace the condenser.
2. Visually inspect for bent fins for clogging of foreign material.
If any fins are clogged, remove the foreign material.
3. Visually inspect for bent fins.
...
Key Warning Light (Red)/Key Indicator Light (Green)
Purpose
KEY warning light (red)
The KEY warning indicator light (red) notifies the user that the engine cannot
be started, the remote transmitter is outside of the vehicle, or that there
is a malfunction in the system.
KEY indicator light (green)
The KEY indicator light (g ...
