Mazda CX-5 Service & Repair Manual: Windshield Washer Nozzle Removal/Installation
1. Remove the following parts:
a. Windshield wiper arm and blade.
b. Cowl grille.
2. Disconnect the windshield washer hose from the windshield washer nozzle..
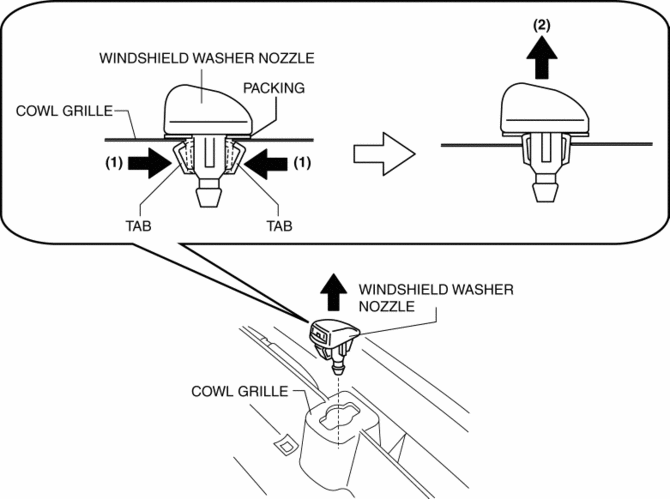
3. While pressing windshield washer nozzle tabs in the direction of the arrow (1) shown in the figure, pull the windshield washer nozzle in the direction of the arrow (2) to remove it from the cowl grille.
4. Install in the reverse order of removal.
5. Adjust the windshield washer nozzle..
 Windshield Washer Nozzle Adjustment
CAUTION:
If the nozzle is adjusted by inserting a stick-like object into the nozzle,
it could deform the injection nozzle and the washer fluid may not spray normally.
When adjusting the ...
 Washer Fluid Level Sensor
Purpose
The washer fluid-level sensor illuminates the low washer fluid level warning
light when the washer fluid level is lowered.
Function
The washer fluid-level sensor detects ...
Other materials:
Rear End Panel Installation [Panel Replacement]
Symbol Mark
Installation Procedure
1. When installing new parts, measure and adjust the body as necessary to conform
with standard dimensions.
2. Drill holes for the plug welding before installing the new parts.
3. After temporarily installing new parts, make sure the related parts fit p ...
Blower Unit Removal/Installation
1. Disconnect the negative battery cable..
2. Remove the following parts:
a. Front scuff plate (passenger-side).
b. Front side trim (passenger-side).
c. Dashboard under cover.
d. Glove compartment.
e. Decoration panel.
f. Lower panel (passenger-side).
3. Disconnect the blower motor c ...
PID/Data Monitor Inspection [Instrument Cluster]
1. Connect the M-MDS to the DLC-2.
2. After the vehicle is identified, select the following items from the initialization
screen of the M-MDS.
a. Select “DataLogger”.
b. Select “Modules”.
c. Select “IC”.
3. Select the applicable PID from the PID table.
4. Verify the PID dat ...
