Mazda CX-5 Service & Repair Manual: Wheel Hub Component Removal/Installation [Awd]
CAUTION:
-
Performing the following procedures without first removing the ABS wheel-speed sensor may possibly cause an open circuit in the wiring harness if it is pulled by mistake. Before performing the following procedures, disconnect the ABS wheel-speed sensor connector (body side) and fix the wiring harness to an appropriate place where it will not be pulled by mistake while servicing the vehicle.
1. When working on the left side of the vehicle, disconnect the auto leveling sensor link. .
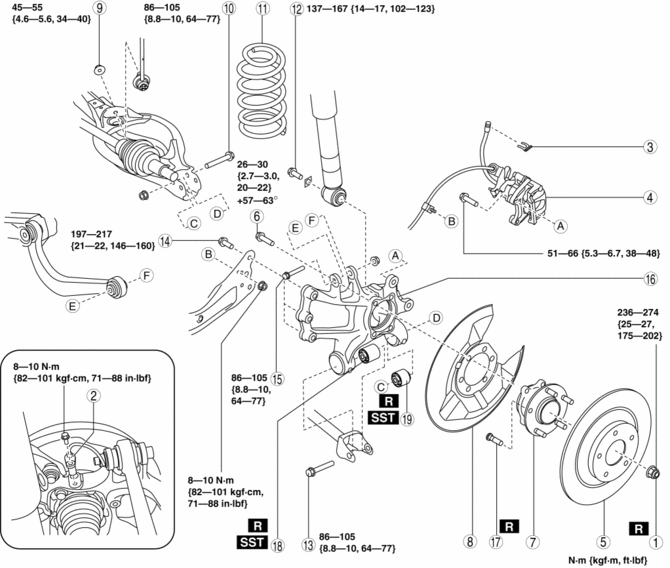
2. Remove in the order indicated in the table.
3. Install in the reverse order of removal.
4. Inspect the rear wheel alignment..
|
1 |
Locknut (See Locknut Installation Note.) |
|
2 |
ABS wheel-speed sensor |
|
3 |
Brake hose clip |
|
4 |
Brake caliper component |
|
5 |
Disc plate |
|
6 |
Bolt (wheel hub) (See WHEEL HUB COMPONENT REMOVAL/INSTALLATION [2WD].) |
|
7 |
Wheel hub |
|
8 |
Dust cover |
|
9 |
Rear stabilizer control link lower side nut |
|
10 |
Rear lower arm outer bolt (See WHEEL HUB COMPONENT REMOVAL/INSTALLATION [2WD].) |
|
11 |
Rear coil spring (See REAR COIL SPRING REMOVAL/INSTALLATION.) |
|
12 |
Rear shock absorber lower bolt (See REAR SHOCK ABSORBER REMOVAL/INSTALLATION.) |
|
13 |
Rear lateral link outer bolt (See REAR LATERAL LINK REMOVAL/INSTALLATION.) |
|
14 |
Rear trailing link installation bolt (See REAR LATERAL LINK REMOVAL/INSTALLATION.) |
|
15 |
Bolt (rear upper arm outer side) |
|
16 |
Hub support |
|
17 |
Wheel hub bolt (See WHEEL HUB COMPONENT REMOVAL/INSTALLATION [2WD].) |
|
18 |
Hub support bushing (front) (See WHEEL HUB COMPONENT REMOVAL/INSTALLATION [2WD].) |
|
19 |
Hub support bushing (rear) (See WHEEL HUB COMPONENT REMOVAL/INSTALLATION [2WD].) |
Locknut Installation Note
1. After tightening the locknut once at a torque of 390 N·m {40 kgf·m, 288 ft·lbf}
, return it temporarily 180 degrees
, then retighten it to a torque of 236—274 N·m {25—27 kgf·m, 175—202 ft·lbf}
.
 Wheel Hub Component Removal/Installation [2 Wd]
CAUTION:
Performing the following procedures without first removing the ABS wheel-speed
sensor may possibly cause an open circuit in the wiring harness if it is pulled
by mistake. Befo ...
 Front Suspension
...
Other materials:
Neutral Switch Inspection
Continuity Inspection
1. Disconnect the negative battery cable..
2. Remove the neutral switch..
3. Inspect for continuity between neutral switch No.1 terminal A and B.
If not as specified, replace the neutral switch No.1..
Specification
Measured conditio ...
Starter [Skyactiv G 2.0]
Purpose, Function
The starter rotates the crankshaft via the ring gear and it serves as a trigger
to start the engine.
Construction
The starter is installed to the rear part of the engine on the left side.
The starter is a coaxial reduction type which can obt ...
Fuel-Filler Lid and Cap
WARNING
When removing the fuel-filler cap, loosen the cap slightly and wait for any hissing
to stop. Then remove it:
Fuel spray is dangerous. Fuel can burn skin and eyes and cause illness if ingested.
Fuel spray is released when there is pressure in the fuel tank and the fuel-filler
cap is r ...
