Mazda CX-5 Service & Repair Manual: Washer Motor Removal/Installation
1. Disconnect the negative battery cable..
2. Set the front over fender aside..
3. Set the mudguard (RH) aside..
4. Remove the front bumper..
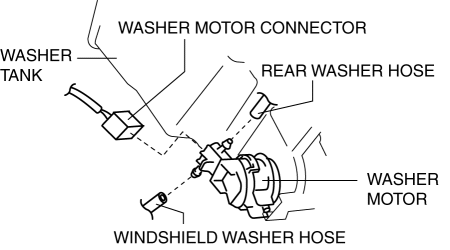
5. Disconnect the washer motor connector from the washer motor.
6. Disconnect the windshield washer hose from the washer motor.
7. Disconnect the rear washer hose from the washer motor.

NOTE:
-
If the washer motor is removed with washer fluid in the washer tank, the washer fluid may leak out. When removing the washer motor from the washer tank, place a container under the washer tank to collect washer fluid, and perform the procedure.
8. Rotate the washer motor counterclockwise/clockwise rotation repeatedly in the direction of the arrows (1) and (2) shown in the figure, and then remove it in the direction of the arrow (3).

9. Remove the grommet.
10. Install in the reverse order of removal.
 Washer Motor Inspection
1. Disconnect the negative battery cable..
2. Set the front over fender aside..
3. Set the mudguard (RH) aside..
4. Remove the front bumper..
5. Disconnect the washer motor connector from the ...
 Washer Nozzle
Purpose
The washer nozzle sprays the washer fluid sent from the washer motor to the
optimum positions on the windshield.
Construction
A ball-shaped spray orifice is set inside t ...
Other materials:
Discharge Headlight System
Outline
The discharge headlight system utilizes a gas discharge type light to emit
a white light resembling sunlight over a wide area. Also, use of the gas discharge
type light realizes high efficiency, low power consumption lighting.
Structural View
System Wiring Diagram
...
Power Brake Unit
Purpose/Function
A 9.8-inch, single diaphragm type power brake unit has been adopted, achieving
compatibility between high braking performance and excellent brake feeling.
Construction
The power brake unit cannot be disassembled. Therefore, if there is any malfunction
in th ...
Rear Mount Camera Removal/Installation
CAUTION:
The audio unit communicates with the rear mount camera and records the presence/non-presence
of the rear mount camera when the ignition is switched to ACC or ON (engine
off or on) after connecting the negative battery cable.
If the commander switch is installed wit ...
