Mazda CX-5 Service & Repair Manual: Vanity Mirror Illumination Bulb Removal/Installation
1. Disconnect the negative battery cable..
2. Insert a tape-wrapped flathead screwdriver into the service hole in the position shown in the figure.

3. Move a flathead screwdriver in the direction of the arrow (1) shown in the figure and detach the lens tab and sunvisor.
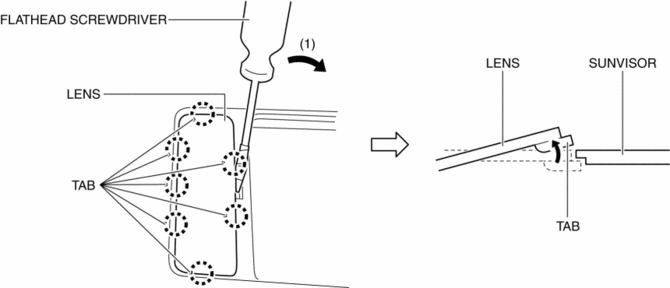
4. Detach all the lens tab and sunvisor and remove the lens from the sunvisor.
5. Remove the vanity mirror illumination bulb.

6. Install in the reverse order of removal.
 Rearview Mirror Removal/Installation
1. Remove the screw.
2. Pull the rearview mirror in the direction of the arrow (1) shown in the figure
3. Install in the reverse order of removal. ...
 Vanity Mirror Illumination Inspection
1. Disconnect the negative battery cable..
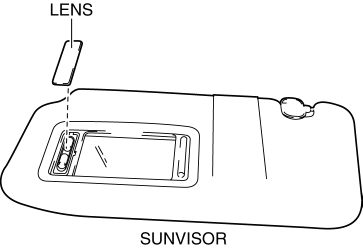
2. Remove the sunvisor..
3. Verify that the continuity between the vanity mirror illumination terminals
is as indicated in the table.
I ...
Other materials:
Electrical System
Electrical Parts
Battery cable
Before disconnecting connectors or removing electrical parts, disconnect
the negative battery cable.
Wiring Harness
To remove the wiring harness from the clip in the engine room, pry up the
hook of the clip using a flathead screwdriver. ...
Blower Unit Removal/Installation
1. Disconnect the negative battery cable..
2. Remove the following parts:
a. Front scuff plate (passenger-side).
b. Front side trim (passenger-side).
c. Dashboard under cover.
d. Glove compartment.
e. Decoration panel.
f. Lower panel (passenger-side).
3. Disconnect the blower motor c ...
Before Service Precaution
WARNING:
Fuel vapor is hazardous. It can very easily ignite, causing serious injury
and damage. Always keep sparks and flames away from fuel.
Fuel line spills and leakage from the pressurized fuel system are dangerous.
Fuel can ignite and cause serious injury or death and damag ...
