Mazda CX-5 Service & Repair Manual: Valve, Valve Spring, Valve Seal, Valve Guide
Purpose, Function
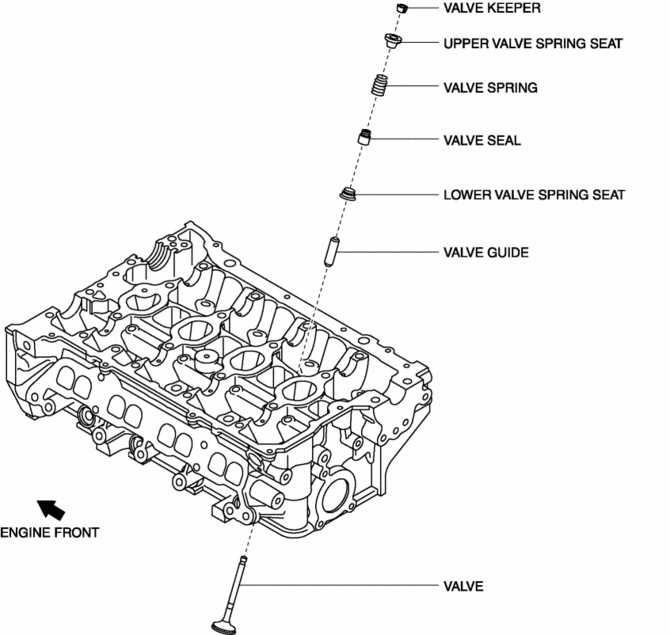
Valve
-
The intake valve is pressed down by the cam, the intake air passage is opened, and air is introduced into the cylinder.
-
The exhaust valve is pressed down by the cam, the exhaust air passage is opened, and combustion gas is exhausted from the cylinder.
Valve spring
-
The valve spring adheres to the valve seat by pulling up the valve by spring force, and air tightness in the combustion chamber is maintained.
Valve seal
-
The valve seal prevents engine oil from entering combustion chamber through the valve guide, and engine oil consumption is suppressed.
Valve guide
-
The valve guide maintains the valve stem to open and close the valve smoothly.
-
The valve guide cools the valve by transmitting valve heat to the cylinder head.
Construction
-
The valve, valve spring, valve seal, and valve guide are assembled to the cylinder head as a single unit.
-
The sliding resistance has been reduced by setting the valve spring load to the required minimum.
-
The intake valve and exhaust valve are subjected to a salt-bath, soft-nitriding treatment to enhance wear resistance.
-
Unequal pitch valve spring has been adopted. In addition, the upper diameter is smaller compared to the bottom diameter.
-
The valve guide is made of sintered alloy with excellent wear resistance.
 Hydraulic Lash Adjuster, Rocker Arm
Purpose, Function
HLA
The HLA maintains the valve clearance at a constant 0 mm and maintenance-free
valve clearance is realized.
Rocker arm
With the adoption of the needle roll ...

Other materials:
Oil Shower Pipe
Outline
Mechanical resistance loss has been reduced through structural changes to
achieve optimum fuel economy. An oil shower pipe has been adopted as a part
of this structural change.
Purpose, Function
The oil shower pipe injects engine oil to lubricate the contact points ...
Installation Of Radio System
The control modules and control unit have been designed with sufficient attention
to radio wave disturbances from the outside. However, observe the following precautions
when installing the radio set to the vehicle to prevent adverse effects on the control
modules and control unit.
Inst ...
Selector Lever Inspection
1. Switch the ignition ON (engine off or on).
2. Perform the following procedures to inspect the selector lever.
If there is any malfunction, adjust the selector cable..
a. Verify that the selector lever can be operated as shown in the figure.
b. Verify that the selector lever ...
