Mazda CX-5 Service & Repair Manual: Upper Cowl Side Reinforcement Removal [Panel Replacement]
Symbol Mark

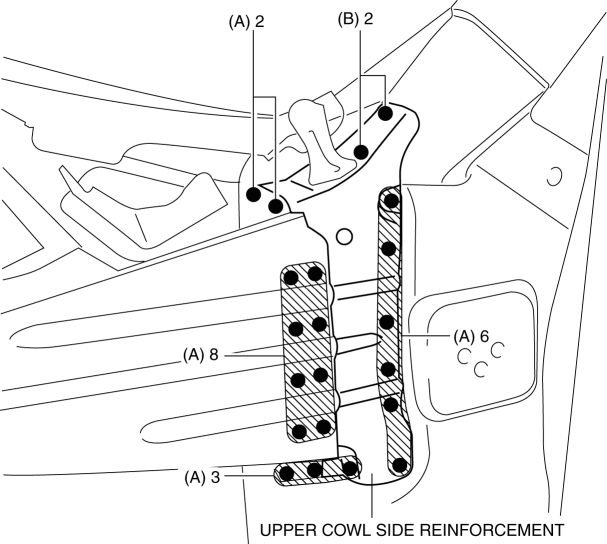
Removal Procedure
1. Drill the 13 locations indicated by (A) shown in the figure.
2. Drill the 8 locations indicated by (B) shown in the figure.
NOTE:
-
When a drill the 8 locations indicated by (B) shown in the figure, the through hole is not made in consideration of the workability at the installing.
3. Remove the upper cowl side reinforcement.
 Upper Cowl Side Reinforcement Installation [Panel Replacement]
Symbol Mark
Installation Procedure
1. When installing new parts, measure and adjust the body as necessary to conform
with standard dimensions.
2. Drill holes for the plug welding before inst ...
 Ventilator Grille Removal/Installation
Side Ventilator Grille
Driver-side
1. Disconnect the negative battery cable..
2. Remove the switch panel..
3. Insert your hand from the area where the switch panel was installed, remove
the si ...
Other materials:
Differential Oil Temperature Sensor Inspection
WARNING:
Hot differential oil may cause severe burns. Do not perform maintenance while
differential oil is hot.
1. Disconnect the negative battery cable.
2. Disconnect the differential oil temperature sensor connector and remove the
differential oil temperature sensor.
3. Wrap ...
Shroud Side Member Removal [Panel Replacement]
Symbol Mark
Removal Procedure
1. Drill the 3 locations indicated by (A) shown in the figure.
2. Drill the 8 locations indicated by (B) and 2 locations indicated by (C) shown
in the figure.
NOTE:
When drilling the 3 locations indicated by (A) and 2 locations indicated
by (C) sh ...
License Plate Light
Purpose
The license plate lights shine light on the license plate during nighttime
driving.
Function
The license plate lights illuminate in conjunction with the operation of
the light switch.
Construction
The license plate lights are installed to the liftgate.
...
