Mazda CX-5 Service & Repair Manual: Turn Signal/Hazard Warning Indicator Lights
Purpose
-
Notifies the driver that a turn light, the hazard warning lights are flashing.
Function
-
Flashes according to the turn switch and hazard warning switch operations.
Construction
-
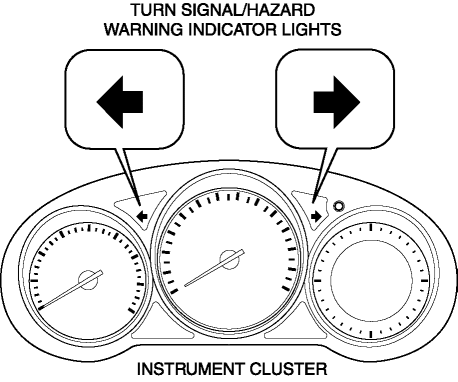
Displayed in the instrument cluster.
Operation
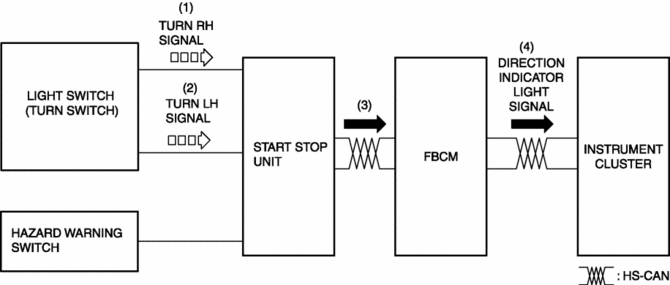
Turn system
1. When the turn switch is operated to the RH position, a turn RH signal is input to the start stop unit.
2. When the turn switch is operated to the LH position, a turn LH signal is input to the start stop unit.
3. The start stop unit sends the turn RH or LH signal to the front body control module (FBCM).
4. The front body control module (FBCM) sends the turn RH or LH signal to the instrument cluster as a direction indicator light signal.
5. When a direction indicator light signal is received, the instrument cluster flashes the direction indicator light.
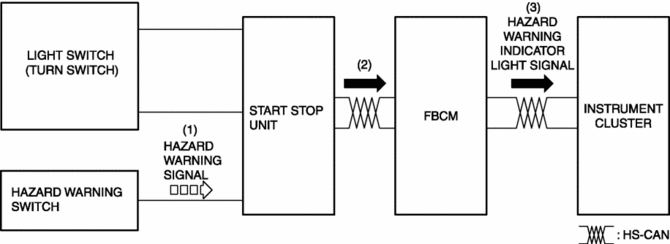
Hazard system
1. When the hazard switch is turned on, a hazard signal is input to the start stop unit.
2. The start stop unit sends a hazard signal to the front body control module (FBCM).
3. The front body control module (FBCM) sends the hazard signal to the instrument cluster as a hazard warning flashing signal.
4. When the hazard warning flash signal is received, the instrument cluster flashes the hazard warning lights.
Fail-safe
-
Function not equipped.
 Turn And Hazard Indicator Alarm
Purpose
The turn and hazard indicator alarm notifies the driver that a turn light
or the hazard warning lights are flashing.
Function
When the instrument cluster receives the tu ...

Other materials:
Keyless Antenna Removal/Installation
With Advanced Keyless Entry System
Vehicle interior, front
1. Disconnect the negative battery cable..
2. Remove the following parts:
a. Decoration panel.
b. Shift lever knob (MTX).
c. Front console box.
d. Shift panel.
e. Upper panel.
f. Rear console.
g. Side wall.
h. Front conso ...
General Procedures (Front And Rear Axles)
Wheel and Tire Installation
1. When installing the wheels and tires, tighten the wheel nuts in a criss-cross
pattern to the following tightening torque.
Tightening torque
108—147 N·m {12—14 kgf·m, 80—108 ft·lbf}
Suspension Links Removal/Installation
1. For the joint ...
Brake Hose (Rear) Removal/Installation
1. Remove in the order indicated in the table.
2. Install in the reverse order of removal.
3. After installation, add brake fluid, bleed the air, and inspect for fluid
leakage..
1
Brake pipe
2
Clip
3
Bolt
...
