Mazda CX-5 Service & Repair Manual: Turn Signal/Hazard Warning Indicator Lights
Purpose
-
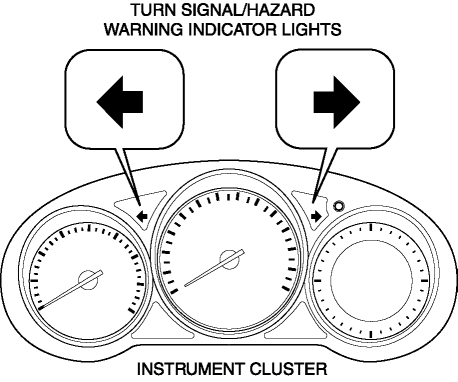
Notifies the driver that a turn light, the hazard warning lights are flashing.
Function
-
Flashes according to the turn switch and hazard warning switch operations.
Construction
-
Displayed in the instrument cluster.

Operation
Turn system
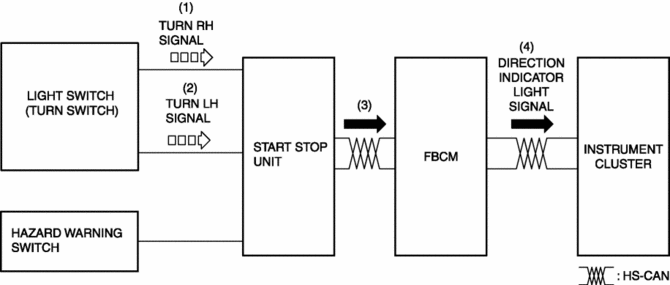
1. When the turn switch is operated to the RH position, a turn RH signal is input to the start stop unit.
2. When the turn switch is operated to the LH position, a turn LH signal is input to the start stop unit.
3. The start stop unit sends the turn RH or LH signal to the front body control module (FBCM).
4. The front body control module (FBCM) sends the turn RH or LH signal to the instrument cluster as a direction indicator light signal.
5. When a direction indicator light signal is received, the instrument cluster flashes the direction indicator light.

Hazard system
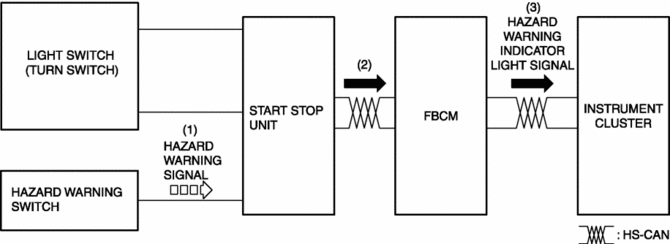
1. When the hazard switch is turned on, a hazard signal is input to the start stop unit.
2. The start stop unit sends a hazard signal to the front body control module (FBCM).
3. The front body control module (FBCM) sends the hazard signal to the instrument cluster as a hazard warning flashing signal.
4. When the hazard warning flash signal is received, the instrument cluster flashes the hazard warning lights.

Fail-safe
-
Function not equipped.
 Turn And Hazard Indicator Alarm
Purpose
The turn and hazard indicator alarm notifies the driver that a turn light
or the hazard warning lights are flashing.
Function
When the instrument cluster receives the tu ...
 Trailer
...
Other materials:
Fuel Tank Pressure Sensor
Purpose/Function
The fuel tank pressure sensor detects the fuel tank pressure.
Fuel tank pressure sensor is only used for OBD.
Construction
The fuel tank pressure sensor is equipped to the charcoal canister.
A piezoelectric-type sensor has been adopted.
...
Fuel Filler Lid Opener Cable Removal/Installation
1. Disconnect the negative battery cable..
2. Remove the following parts:
a. Front scuff plate (LH).
b. Front seat (LH).
c. Rear scuff plate.
d. B-pillar lower trim (LH).
e. Rear seat (4:2:4 split type).
f. Rear seat cushion (6:4 split type).
g. Rear seat back (6:4 split type).
h. ...
Cruise Main Indicator Light (Amber)
Purpose/Function
Illuminates while the cruise control system is in standby mode to inform
the driver that the cruise control system is on standby.
Construction
Built into the instrument cluster.
Operation
Illuminates while the cruise control system is on sta ...
