Mazda CX-5 Owners Manual: Troubleshooting
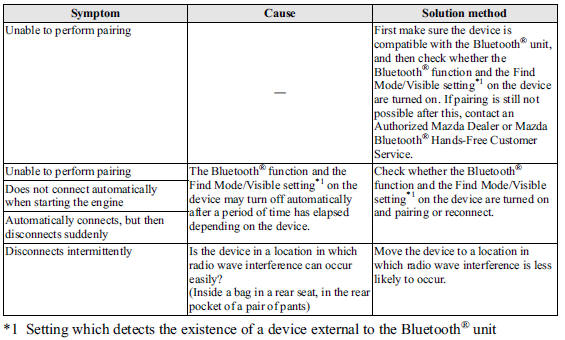
Bluetooth® does not operate under the following conditions. Check whether the following conditions apply to your Bluetooth® device:
• The device is not being operated correctly.
• The device is not connected to the Bluetooth® unit equipped on the vehicle.
• The device's battery is weak.
• A device which interferes with radio wave reception has been placed in the vehicle.
• The ignition switch has been turned off.
If none of the above conditions apply, refer to the following to see if any of the problem symptoms correspond to your device.
If the problem cannot be resolved, consult an Authorized Mazda Dealer or Mazda Bluetooth® Hands-Free Customer Service.
Mazda Bluetooth® Hands-Free Customer Service
If you have any problems with Bluetooth®, contact with our toll-free customer service center.
• U.S.A.
Phone:800-430-0153 (Toll-free) Web: www.MazdaUSA.com/bluetooth •Canada Phone:800-430-0153 (Toll-free) Web: www.mazdahandsfree.ca • Mexico Center of Attention to Client (CAC) Phone:01-800-01-MAZDA (Toll-free) Web: www.MazdaUSA.com/bluetooth
Device pairing, connection problems
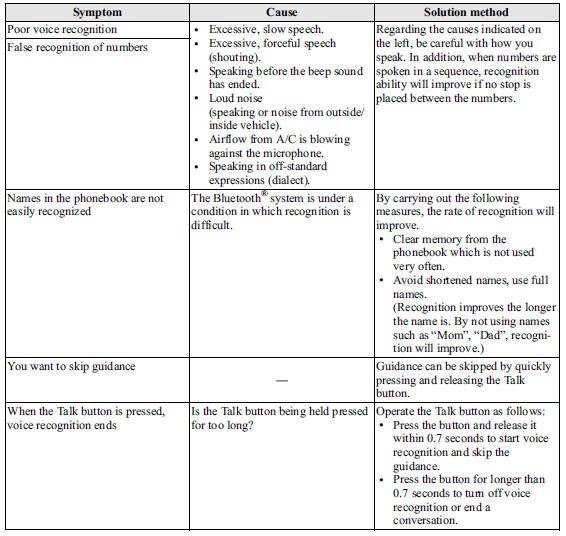
Voice recognition related problems
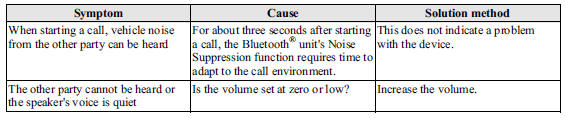
Regarding problems with calls
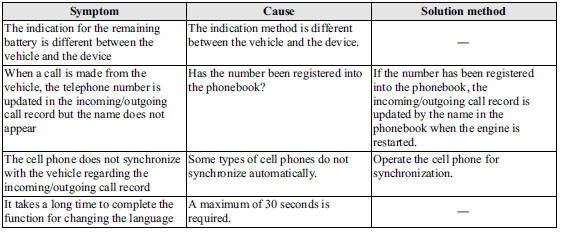
Other problems
 Bluetooth® Audio
Applicable Bluetooth® specification Ver. 2.0 or higher
Response profile
• A2DP (Advanced Audio Distribution Profile)
Ver. 1.0/1.2
• AVRCP (Audio/Video Remote Control Profile)
Ver. 1.0/1.3/ ...

Other materials:
Airflow Mode Actuator [Full Auto Air Conditioner]
Purpose
The airflow mode actuator moves the mode door in the A/C unit to switch the
air vent.
Function
Door open/close function
The airflow mode actuator drives the motor based on the signal from the climate
control unit and moves the mode door to the VENT, BI-LEVEL, HEAT, ...
Column Cover Removal/Installation
1. Pull down the steering wheel.
2. Press the shaded area shown in the figure using your thumb, and lift the upper
column cover in the direction of arrow (1).
3. Pull the upper column cover in the direction of the arrow (2) and remove it
while detaching pins A, tabs B and guides C.
4. ...
Rear Seat Back Striker Removal/Installation
1. Disconnect the negative battery cable..
2. Press the push knob to fold the rear seat back.
3. Remove the following parts:
a. Trunk board.
b. Trunk end trim.
c. Rear scuff plate.
d. Trunk side trim.
4. Remove the bolts.
5. Remove the rear seat back striker.
6. Install in the ...
