Mazda CX-5 Service & Repair Manual: Transfer Removal/Installation [Fw6 Ax EL]
CAUTION:
-
Performing the following procedures without first removing the front ABS wheel-speed sensor may possibly cause an open circuit in the harness if it is pulled by mistake. Before performing the following procedures, disconnect the front ABS wheel-speed sensor (axle side) and fix it to an appropriate place where the sensor will not be pulled by mistake while servicing the vehicle.
-
Secure the steering wheel using tape or a cable to prevent the steering shaft from rotating after disconnecting the steering shaft. If the steering wheel rotates after the steering shaft and the steering gear and linkage are disconnected, the internal parts of the clock spring could be damaged.
1. Disconnect the negative battery cable..
2. Remove the propeller shaft..
3. Remove the front crossmember component..
4. Remove the exhaust manifold (WU-TWC)..
5. Remove the front drive shaft (RH)..
6. Remove the heat shield.
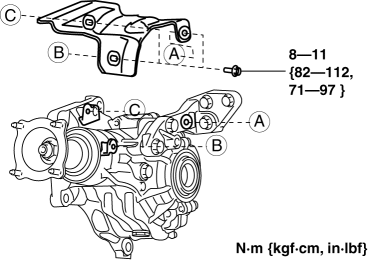
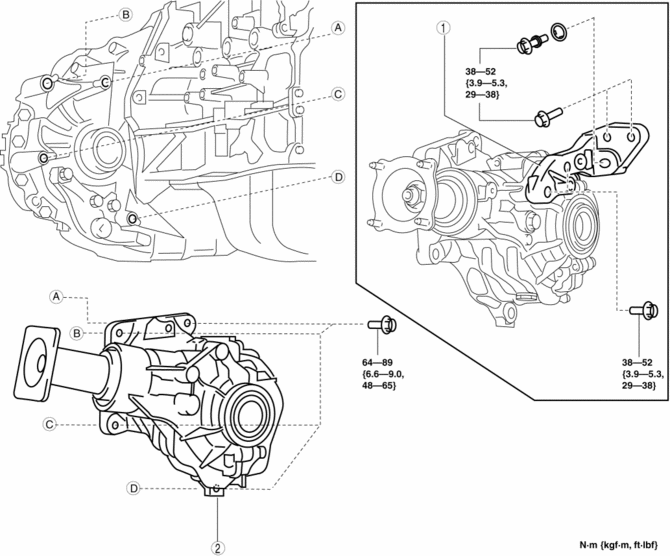
7. Remove in the order indicated in the table.
8. Install in the reverse order of removal.
9. Warm up the engine and transaxle, inspect for oil leakage, and inspect the transfer operation.
|
1 |
Transfer bracket (See Transfer Bracket Installation Note.) |
|
2 |
Transfer |
Transfer Bracket Installation Note
1. Install the transfer bracket to transfer, then temporarily tighten bolts A and B.
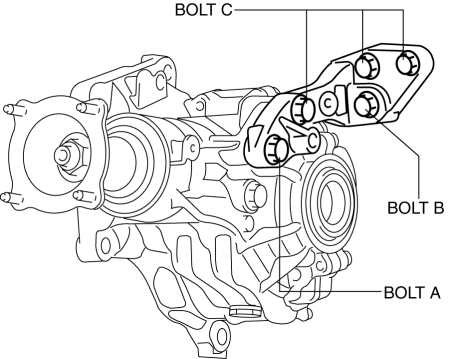
2. Tighten bolts B, A & C in this order.
-
Tightening torque
-
38—52 N·m {3.9—5.3kgf·m, 29—38 ft·lbf}
 Transfer Oil Seal Replacement [Fw6 Ax EL]
Transfer oil seal (LH)
1. Drain the transfer oil..
2. Remove the transfer from the vehicle..
3. Insert a tape-wrapped flathead screwdriver into the lip area of the oil seal
(LH) as shown in the ...
 Turbine/Input Shaft Speed Sensor, Output Shaft Speed Sensor [Fw6 A EL, Fw6 Ax
EL]
Turbine/Input Shaft Speed Sensor, Output Shaft Speed Sensor [Fw6 A EL, Fw6 Ax
EL]
Purpose/Function
The turbine/input shaft speed sensor detects the rotation speed of the input
shaft (low clutch drum).
The output shaft speed sensor detects the rotation speed of the ...
Other materials:
Hydraulic Lash Adjuster, Rocker Arm
Purpose, Function
HLA
The HLA maintains the valve clearance at a constant 0 mm and maintenance-free
valve clearance is realized.
Rocker arm
With the adoption of the needle roller bearing built into the rocker arm,
the contact to the cam employs rolling contact to reduce sl ...
Decoration Panel Removal/Installation
CAUTION:
Affix protective tape to the position shown in the figure.
1. Disconnect the negative battery cable..
2. Open the glove compartment.
3. Insert a tape-wrapped flathead screwdriver in the position indicated by the
arrow (1) in the figure and detach clip A.
4. ...
Passenger Side Air Bag Module [Two Step Deployment Control System]
Purpose
When the passenger-side air bag module receives an impact from a frontal
or frontal offset collision, the operation (deployment) of the air bag mediates
the impact to the head and face of the front passenger.
Function
When the passenger-side air bag module receives ...
