Mazda CX-5 Owners Manual: SRS Air Bag Deployment Criteria
This chart indicates the applicable SRS equipment that will deploy depending on the type of collision.
(The illustrations are the representative cases of collisions.)
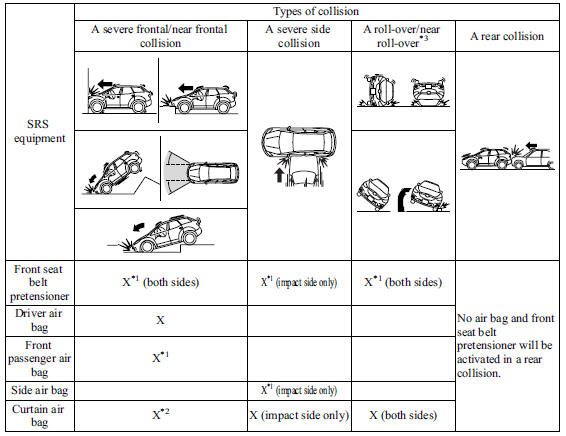
X: The SRS air bag equipment is designed to deploy in a collision.
*1 (With Driver and Front Passenger Occupant Classification System) The front passenger front and side air bags and the seat belt pretensioner are designed to deploy depending on the condition of the total seated weight on the front passenger seat.
*2 (With Driver and Front Passenger Occupant Classification System) In an angled collision, the curtain air bag might deploy.
*3 (With Driver and Front Passenger Occupant Classification System) In a roll-over accident, the seat belt pretensioners and the curtain air bags deploy.
 How the SRS Air Bags Work
Your Mazda is equipped with the following types of SRS air bags. SRS air bags
are designed to work together with the seat belts to help to reduce injuries during
an accident.
The SRS air bags are ...
 Limitations to SRS Air Bag
In severe collisions such as those described previously in “SRS Air Bag Deployment
Criteria”, the applicable SRS air bag equipment will deploy. However, in some accidents,
the equipment may no ...
Other materials:
Air Bag Module And Pre Tensioner Seat Belt Deployment Procedures [Two Step Deployment
Control System]
WARNING:
A live (undeployed) air bag module, pre-tensioner seat belt or lap pre-tensioner
seat belt may accidentally operate (deploy) when it is disposed of and cause
serious injury. Do not dispose of a live (undeployed) air bag module, pre-tensioner
seat belt or lap pre-tensioner s ...
PID/Data Monitor Inspection [Front Body Control Module (Fbcm)]
1. Connect the M-MDS to the DLC-2.
2. After the vehicle is identified, select the following items from the initialization
screen of the M-MDS.
a. Select “DataLogger”.
b. Select “Modules”.
c. Select “F_BCM”.
3. Select the applicable PID from the PID table.
4. Verify the PID ...
Down Switch Inspection [Fw6 A EL, Fw6 Ax EL]
Continuity Inspection
NOTE:
The down switch is built into the selector lever component.
1. Disconnect the negative battery cable..
2. Remove the front console..
3. Disconnect the selector lever component connector.
4. Verify that the continuity between selector lever compone ...
