
Mazda CX-5 Owners Manual: Specifications
Specifications
Engine

Electrical System

CAUTION
When cleaning the iridium plugs, do not use a wire brush. The fine particulate coating on the iridium alloy and platinum tips could be damaged.
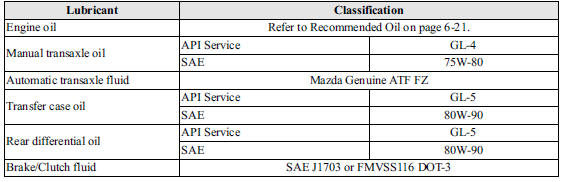
Lubricant Quality
NOTE
Refer to Introduction on for owner's responsibility in protecting your investment.
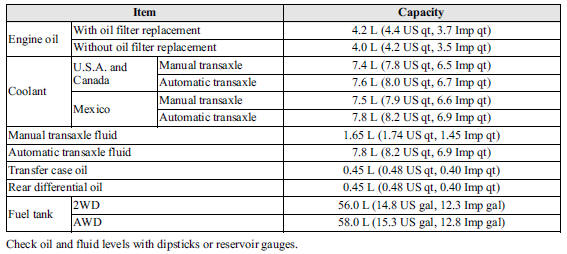
Capacities
(Approximate Quantities)
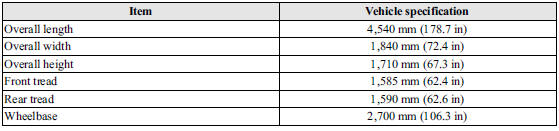
Dimensions
Weights
2WD

AWD

Air Conditioner

Light Bulbs
Exterior light
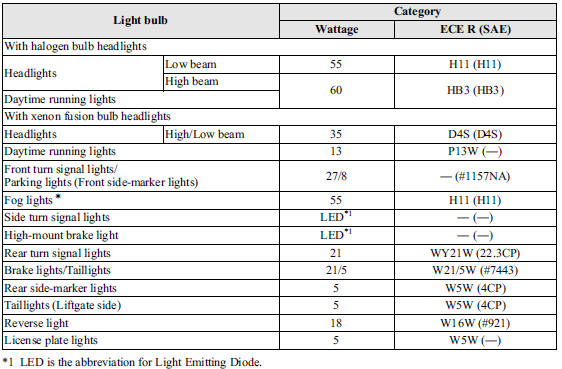
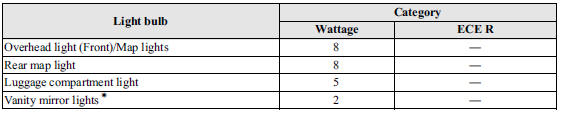
Interior light
Tires
NOTE
The tires have been optimally matched with the chassis of your vehicle.
When replacing tires, Mazda recommends that you replace tires of the same type originally fitted to your vehicle. For details, contact an Authorized Mazda Dealer.
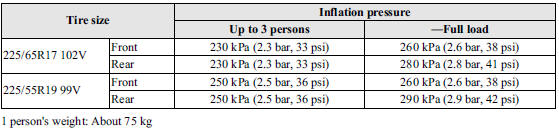
Check the tire pressure label for tire size and inflation pressure.
Refer to Tire Inflation Pressure 6.
After adjusting the tire pressure, initialization of the tire pressure monitoring system is necessary to make the system operates normally.
Refer to Tire Pressure Monitoring System Initialization 3.
Standard tire
(U.S.A. and Canada)

(Mexico)
Temporary spare tire
(U.S.A. and Canada)

(Mexico)

 Identification Numbers
Vehicle Information Labels
Vehicle Identification Number
The vehicle identification number legally identifies your vehicle. The number
is on a plate attached to the left top side of the dashboard ...
 Personalization Features
Personalization Features
...
Other materials:
Catch Tank
Purpose, Function
Suppresses pulsation occurring before evaporative gas is inducted into the
intake manifold.
Construction
The catch tank is installed in the engine compartment.
Operation
When evaporative gas flows from the charcoal canister to the purge sol ...
TCM [Fw6 A EL, Fw6 Ax EL]
Purpose/Function
The TCM detects the vehicle conditions and performs calculations and processing
based on input information from each type of sensor and switch.
Outputs control signals to each solenoid valve so that each type of control
is optimally implemented according to the ...
Floor Mat
WARNING
Make sure the floor mats are hooked on the retention pins to prevent them from
bunching up under the foot pedals:
Using a floor mat that is not secured is dangerous as it will interfere with
the accelerator and brake pedal operation, which could result in an accident.
Do not install t ...
