Mazda CX-5 Service & Repair Manual: Solar Radiation Sensor Removal/Installation [Full Auto Air Conditioner]
NOTE:
-
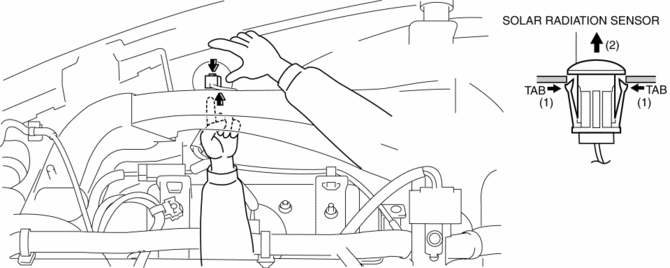
When removing the solar radiation sensor, perform the procedure in the posture shown in the figure.

1. Disconnect the negative battery cable..
2. Remove the following parts:
a. Front scuff plate (passenger-side).
b. Front side trim (passenger-side).
c. Dashboard under cover.
d. Front heat duct (passenger-side).
e. Glove compartment.
f. Decoration panel.
g. Lower panel (passenger-side).
h. Blower unit.
3. Press the tab from the inside of the dashboard and press out the solar radiation sensor as shown in the figure.

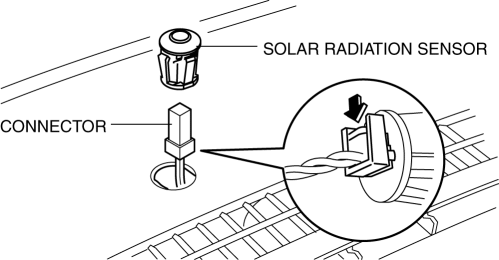
4. Disconnect the solar radiation sensor connector.

5. Remove the solar radiation sensor.
6. Install in the reverse order of removal.
Solar Radiation Sensor Installation Note
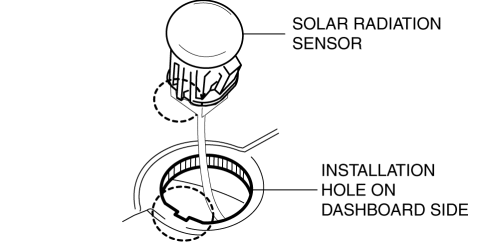
1. Align the shape of the solar radiation sensor with the shape of the installation hole on the dashboard side, and install as shown in the figure.

 Solar Radiation Sensor Inspection [Full Auto Air Conditioner]
1. Shine a fluorescent light or expose the solar radiation sensor to natural
sunlight.
2. Connect the positive (+) lead to terminals B, C and negative (-) lead to terminal
A of the solar radiati ...
 Solar Radiation Sensor [Full Auto Air Conditioner]
Purpose
The solar radiation sensor detects the sunlight intensity emitted to the
cabin.
Function
The solar radiation sensor converts the detected solar radiation amount to
an ...
Other materials:
Front Side Frame Removal [Panel Replacement]
Symbol Mark
Removal Procedure
1. Drill the 15 locations indicated by (A) shown in the figure.
2. Drill the 4 locations indicated by (B) shown in the figure.
NOTE:
When drilling the 4 locations indicated by (B) shown in the figure, do not
drill a hole all the way through or there ...
Engine Oil Control
Outline
The PCM reduces the oil pump load applied to the engine by controlling the
appropriate engine hydraulic pressure according to the engine operation conditions.
The engine hydraulic pressure switches in two steps. When hydraulic pressure
is not needed, the oil pump dischar ...
PID/Data Monitor Inspection [Standard Deployment Control System]
1. Connect the M-MDS to the DLC?2.
2. After the vehicle is identified, select the following items from the initialization
screen of the M-MDS.
a. Select “DataLogger”.
b. Select “Modules”.
c. Select “RCM”.
3. Select the applicable PID from the PID table.
4. Verify the PID da ...
