Mazda CX-5 Service & Repair Manual: Side Wall Removal/Installation
1. Pull the side wall in the direction of the arrow in the order of (1), (2) and remove it while detaching hooks A and clip B.
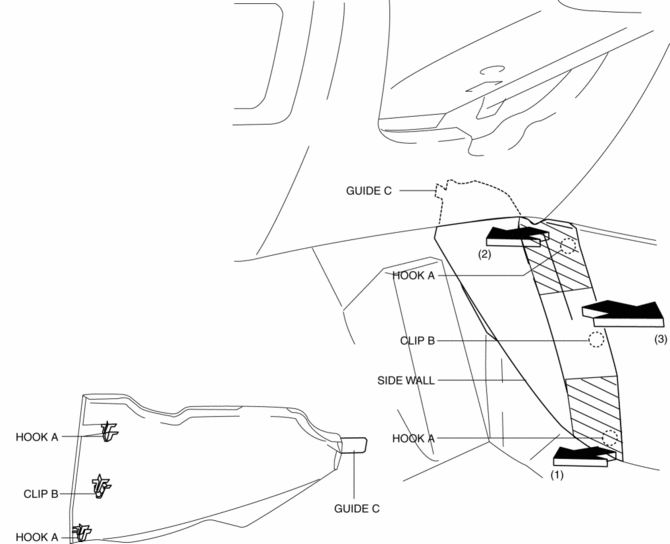
2. Pull the side wall in the direction of the arrow (3) and remove it while detaching the guide C.
CAUTION:
-
If the hooks A and clip B is removed forcefully, guide C may be damaged. Carefully remove hooks A and clip B so as not to damage guide C.
3. Install in the reverse order of removal.
 Shift Panel Removal/Installation
ATX
1. Disconnect the negative battery cable..
2. Selector lever to neutral position.
3. Remove the front console box..
4. Take the shaded area shown in the figure, and remove the shift panel i ...
 Switch Panel Removal/Installation
1. Disconnect the negative battery cable..
2. Remove the car-navigation unit. (with car-navigation system).
3. Insert your hand from the lower side of the lower panel (without car-navigation
sys ...
Other materials:
Power Outer Mirror Switch Inspection
1. Disconnect the negative battery cable..
2. Remove the power outer mirror switch..
3. Verify that the continuity between the power outer mirror switch terminals
is as indicated in the table.
If not as indicated in the table, replace the power outer mirror switch..
...
Air Bag Module And Pre Tensioner Seat Belt Disposal Procedures [Two Step Deployment
Control System]
WARNING:
A live (undeployed) air bag module, pre-tensioner seat belt or lap pre-tensioner
seat belt may accidentally operate (deploy) when it is disposed of and cause
serious injury. Always refer to the “AIR BAG MODULE AND PRE-TENSIONER SEAT
BELT DEPLOYMENT PROCEDURES” and ...
Brake Pedal
Purpose/Function
An intrusion-minimizing brake pedal has been adopted to the brake pedal to
provide for a measure of safety in the event of an accident.
The intrusion-minimizing brake pedal mechanism reduces impact to the lower
extremities of the driver by minimizing the amount ...
