Mazda CX-5 Service & Repair Manual: Shroud Upper Reinforcement Removal [Panel Replacement]
Symbol Mark

Removal Procedure
1. Drill the 4 locations shown in the figure.
NOTE:
-
When drilling the 4 locations shown in the figure, do not drill a hole all the way through or there could be a problem when installing the new part.
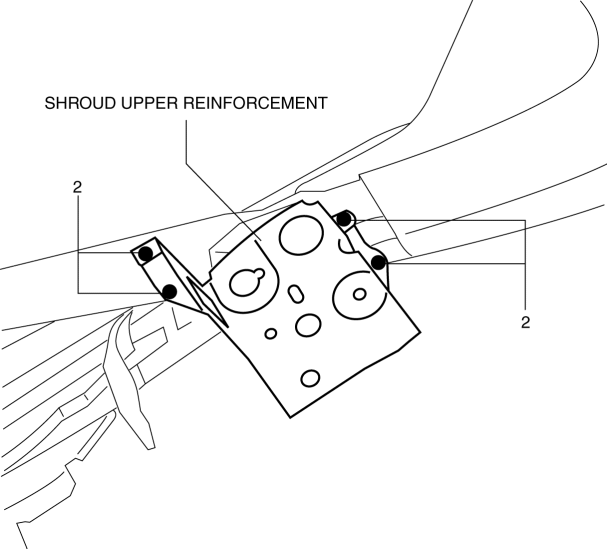
2. Remove the shroud upper reinforcement.
 Shroud Upper Reinforcement Installation [Panel Replacement]
Symbol Mark
Installation Procedure
1. When installing new parts, measure and adjust the body as necessary to conform
with standard dimensions.
2. Drill holes for the plug welding before inst ...
 Water Pump Removal/Installation
WARNING:
Never remove the cooling system cap or loosen the radiator drain plug while
the engine is running, or when the engine and radiator are hot. Scalding engine
coolant and steam may ...
Other materials:
Sas Control Module Removal/Installation [Standard Deployment Control System]
WARNING:
Handling the SAS control module or air bag module improperly can accidentally
deploy the air bag modules and pre-tensioner seat belts, which may seriously
injure you. Read the air bag system service warnings and cautions before handling
the air bag module..
If the c ...
Front ABS Wheel Speed Sensor Inspection
Sensor Output Value Inspection
CAUTION:
Resistance inspection using other testers may cause damage to the ABS wheel-speed
sensor internal circuit. Be sure to use the M-MDS to inspect the ABS wheel-speed
sensor.
1. Switch the ignition to off.
2. Connect the M-MDS to the DLC-2. ...
Cooling Fan Relay
Purpose, Function
The cooling fan relay operates by receiving the signal from the PCM to supply
power to the cooling fan motor.
Construction
The cooling fan relay is installed on the relay and fuse block.
Operation
The contact point is on when the battery vo ...
