Mazda CX-5 Service & Repair Manual: Shift Pressure Control (Direct Electric Shift Control) [Fw6 A EL, Fw6 Ax EL]
Outline
-
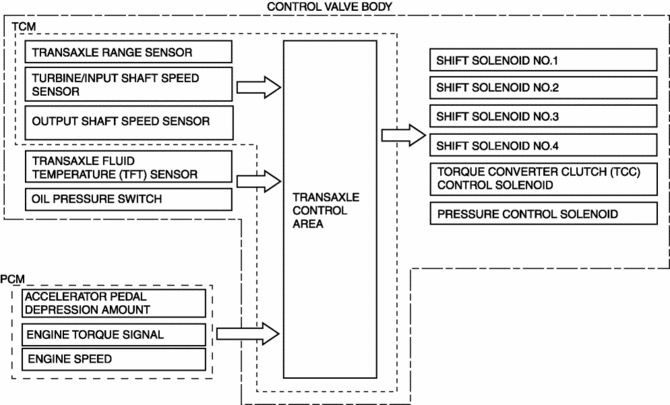
The TCM drives shift solenoids No.1, 2, 3, 4, the pressure control solenoid, and the on/off solenoid based on inputs signals from each switch and sensor, and performs direct electronic control of the clutch engagement pressure. As a result, precise hydraulic pressure control of the clutch engagement, not possible using a conventional accumulator, is achieved.
Construction

Operation
N to D, and N to R selected
-
When N to D, and N to R are selected, the TCM drives the pressure control solenoid and shift solenoids No. 1 and 3 for optimum clutch engagement pressure control.
Shifting
-
During shifting, the TCM drives shift solenoids No.1, 2, 3, and 4 to directly control the clutch engagement pressure for optimum clutch engagement pressure control.
-
During each gear shift, the engagement side clutch pressure and release side clutch pressure are controlled simultaneously. As a result, the torque capacities of both clutches can be controlled in connection to each other when switching clutches, engine over-speed during shifting and interlock among clutches is prevented, and smooth and responsive shifting is achieved.
 Shift Lock System [Fw6 A EL, Fw6 Ax EL]
Purpose, Function
The shift-lock system operates when the ignition is switched to ON and the
brake pedal is not depressed, and inhibits the selector lever from being shifted
from the P po ...
 Shift Pressure Control (Learning Control) [Fw6 A EL, Fw6 Ax EL]
Outline
The TCM optimizes the hydraulic pressure for clutch engagement and disengagement
through learning correction of the clutch engagement pressure.
NOTE:
The clutch engagem ...
Other materials:
Front Suspension
Outline
A strut type front suspension has been adopted.
The connection area of the front crossmember and body is a 6-point rigid
mount type.
The cross-section on the center member of the front crossmember has been
expanded and the longitudinal offset of the ...
Shift Control Module Removal/Installation [C66 M R]
Removal
1. Shift the shift lever to the neutral position.
2. Remove the plug hole plate..
3. Disconnect the negative battery cable..
4. Remove the air cleaner and air hose as a single unit..
5. Remove the battery and battery tray..
6. Disconnect the control cable from the transaxle.
a. ...
Cruise Control Switch Inspection
1. Disconnect the negative battery cable and wait for 1 min or more..
2. Remove the driver?side air bag module..
3. Disconnect the clock spring connector (part wiring harness-side).
4. Measure the resistance between clock spring terminals E and A (part wiring
harness-side) using a tester.
...
