Mazda CX-5 Service & Repair Manual: Seat Weight Sensor Control Module Removal/Installation [Two Step Deployment Control System]
CAUTION:
-
When the seat weight sensor control module is replaced with a new one, perform the seat weight sensor calibration using the M?MDS..
1. Switch the ignition to off.
2. Disconnect the negative battery cable and wait for 1 min or more
..
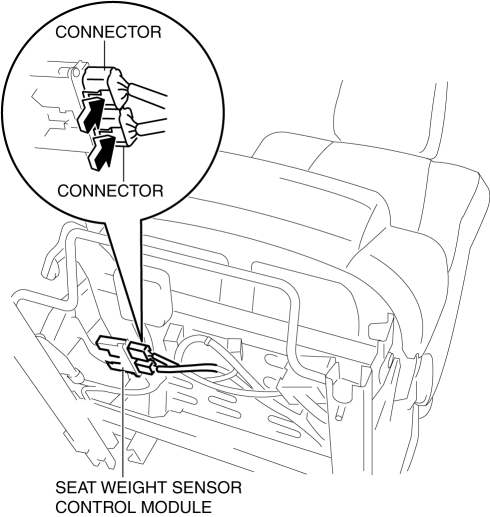
3. Disconnect the connectors.

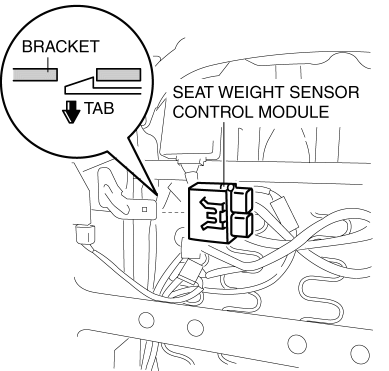
4. Remove the seat weight sensor control module from the bracket by lifting the tab in the direction of the arrow.

5. Install in the reverse order of removal.
6. Switch the ignition ON (engine off or on).
7. Verify that the air bag system warning light illuminates for approx. 6 s
and goes out.
-
If the air bag system warning light does not operate normally, refer to the on-board diagnostic system (air bag system) and perform inspection of the system..
 Seat Weight Sensor Calibration [Two Step Deployment Control System]
CAUTION:
If any of the following work is performed, perform the seat weight sensor
calibration using the M-MDS.
Replacement with a new seat weight sensor
Replacement ...
 Seat Weight Sensor Inspection [Two Step Deployment Control System]
CAUTION:
If any of the following work is performed, perform the seat weight sensor
inspection using the M-MDS.
Removal of the passenger-side seat
Loosening and retig ...
Other materials:
Awd Warning Light
Purpose, Function
Warns the driver of a AWD system malfunction.
Construction
The AWD warning light is built into the instrument cluster.
Operation
If the self-diagnostic function stores a DTC, the warning light illuminates
to alert the driver of the malfunct ...
Front Beltline Molding Removal/Installation
CAUTION:
Affix protective tape to the position shown in the figure.
1. Fully open the front door glass.
2. Insert a tape-wrapped flathead screwdriver and then detach clips A in the
direction of arrow (1) shown in the figure.
3. Pull up the front side of front beltline molding ...
Shroud Side Member Removal [Panel Replacement]
Symbol Mark
Removal Procedure
1. Drill the 3 locations indicated by (A) shown in the figure.
2. Drill the 8 locations indicated by (B) and 2 locations indicated by (C) shown
in the figure.
NOTE:
When drilling the 3 locations indicated by (A) and 2 locations indicated
by (C) sh ...
