Mazda CX-5 Service & Repair Manual: Seat Belt Warning Light
Purpose
-
The seat belt warning light warns the driver that a seat belt is not fastened.
Function
-
The instrument cluster flashes/illuminates the seat belt warning light based on the following CAN signals:
-
Vehicle speed signal sent from PCM
-
Driver/passenger buckle switch signal, occupancy detection sensor signal sent from SAS control module
Driver/passenger seat belt warning light display function
-
The driver/passenger seat belt warning light has a warning for when the vehicle is stopped, while the vehicle is being driven, and subsequent warnings while the vehicle is being driven.
-
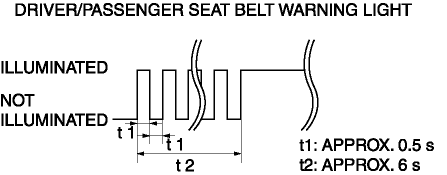
When all of the following conditions are met, it flashes/illuminates.
-
Ignition switch ON (engine off or on)
-
Driver/passenger buckle switch on signal (seat belt unfastened) is detected
-
Occupancy sensor on signal (occupant in passenger seat) is detected (passenger seat belt warning light only)
-
The driver/passenger seat belt warning flash/illumination pattern is as shown in the figure.
-
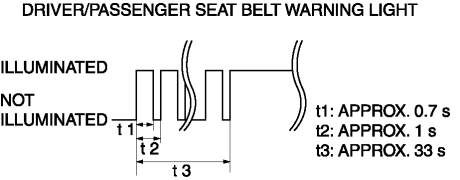
When all of the following conditions are met, it flashes/illuminates
-
Vehicle speed is approx. 20 km/h {12 mph} or more
-
Driver/passenger buckle switch on signal (seat belt unfastened) is detected
-
Occupancy sensor on signal (occupant in passenger seat) is detected (passenger seat belt warning light only)
-
The driver/passenger seat belt warning flash/illumination pattern is as shown in the figure.
-
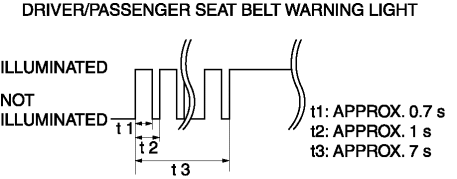
When all of the following conditions are met, it flashes/illuminates
-
Vehicle speed is approx. 20 km/h {12 mph} or more
-
Occupancy sensor on signal (occupant in passenger seat) is detected (passenger seat belt warning light only)
-
After warning while vehicle is being driven operates, buckle switch off signal (seat belt fastened) to on signal (seat belt unfastened) is detected
-
The driver/passenger seat belt warning flash/illumination pattern is as shown in the figure.
-
Warning when vehicle is stopped
-
Warning while vehicle is driven
-
Subsequent warning while vehicle is driven
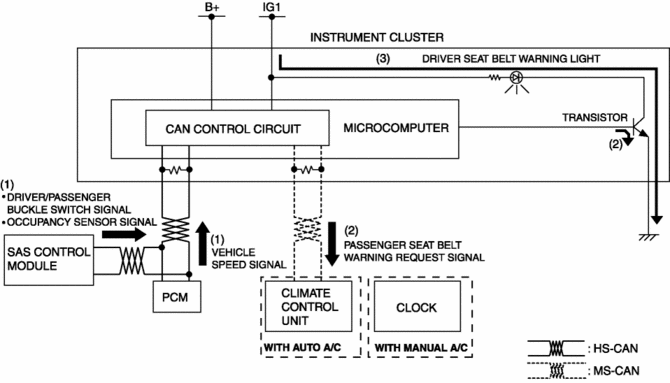
Construction
-
The microcomputer in the instrument cluster controls the illumination/flashing/turning off of the seat belt warning light based on the driver/passenger buckle switch signal and occupancy sensor signal from the SAS control module, and the vehicle speed signal from the PCM.
-
The driver seat belt warning light is set in the instrument cluster.

-
The passenger seat belt warning light are set in the clock (with manual A/C)/climate control unit (with auto A/C). For details on the passenger seat belt warning light, refer to CLOCK (with manual A/C)/CLIMATE CONTROL UNIT [FULL-AUTO AIR CONDITIONER] (with auto A/C).
Operation
1. The instrument cluster receives (1) a vehicle speed signal from the PCM, and a driver/passenger seat buckle switch signal and occupancy sensor signal from the SAS control module.
2. The instrument cluster microcomputer turns the transistor on (2) intermittently for flashing and continuously for illumination based on the each signal. In addition, it sends a driver/passenger seat belt warning request signal to the clock (with manual A/C)/climate control unit (with auto A/C).
3. When the transistor turns on intermittently, the driver seat belt warning light flashes (3), when it turns on continuously, the driver seat belt warning light illuminates (3).
Fail-safe
-
Function not equipped.
 Seat Belt Warning Alarm
Purpose
The seat belt warning alarm warns occupants that a seat belt is not fastened.
Function
The instrument cluster sounds the seat belt warning alarm based on the following
C ...
 Security Indicator Light
Purpose
Notifies the driver that the immobilizer system is operating.
Function
If a malfunction is detected in the immobilizer system, the DTC can be verified
by the flashing pa ...
Other materials:
Seat Weight Sensor Control Module Removal/Installation [Two Step Deployment
Control System]
CAUTION:
When the seat weight sensor control module is replaced with a new one, perform
the seat weight sensor calibration using the M?MDS..
1. Switch the ignition to off.
2. Disconnect the negative battery cable and wait for 1 min or more..
3. Disconnect the connectors.
...
Back Up Light Switch Inspection
1. Disconnect the negative battery cable..
2. Remove the front under cover No.2..
3. Remove the back-up light switch..
4. Verify that the continuity between the back-up light switch terminals is as
indicated in the table.
If not as indicated in the table, replace the back-up ...
Engine Coolant Protection Inspection
1. Measure the engine coolant temperature and specific gravity using a thermometer
and a hydrometer.
CAUTION:
Use engine coolant at a concentration that meets the environmental conditions
in which the vehicle is driven, otherwise engine damage could occur.
The engine has alumi ...
