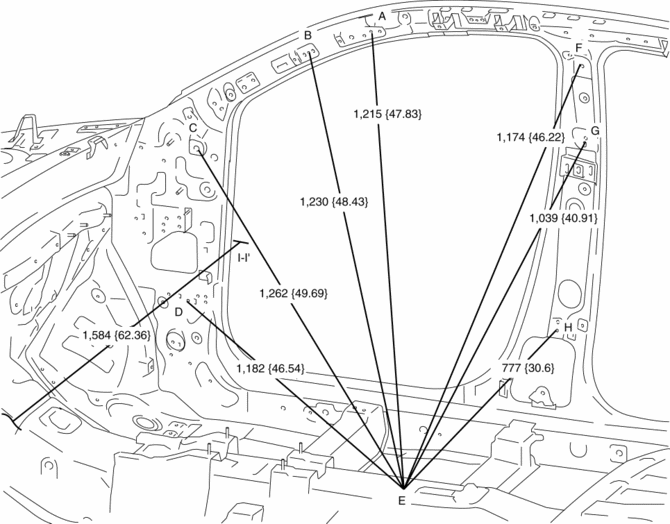
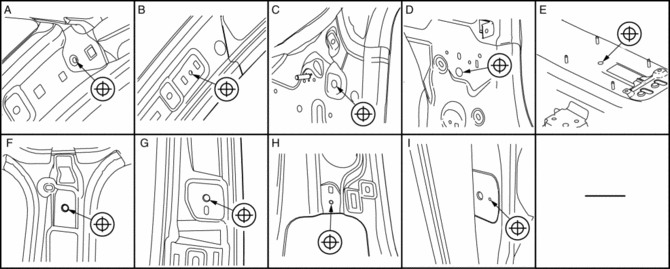
Mazda CX-5 Service & Repair Manual: Room Straight Line Dimensions (1) [Dimensions]
|
Point symbol |
Designation |
Hole diameter or bolt or nut size mm {in} |
|
A |
Front pillar inner datum hole |
?7 {0.3} |
|
B |
Front pillar inner datum hole |
?7 {0.3} |
|
C |
Dashboard installation hole |
?14 {0.55} |
|
D |
Side sill inner front datum hole |
?16 {0.63} |
|
E |
Parking brake lever installation hole |
?12 {0.47} |
|
F |
Front seat belt upper anchor installation hole |
?14 {0.55} |
|
G |
Front seat belt upper anchor installation hole |
?14 {0.55} |
|
H |
Center pillar inner datum hole |
?7 {0.3} |
|
I |
Front door checker installation hole |
?4 {0.2} |
 Rear Side Frame Removal [Panel Replacement]
Symbol Mark
Removal Procedure
NOTE:
When drilling the 35 locations indicated by (A) and 4 locations indicated
by (C) shown in the figure, do not drill a hole all the way through or th ...
 Room Straight Line Dimensions (2) [Dimensions]
Point symbol
Designation
Hole diameter or bolt or nut size mm {in}
A
Front seat belt upper anchor installation
...
Other materials:
Rear Door Latch And Lock Actuator Inspection
The following actuator and switch are integrated with the rear door latch
and lock actuator.
From the actuator/switch name and operation in the following table, select
the actuator or switch to be inspected, and perform the inspection following
the inspection procedure des ...
Afs (Adaptive Front Lighting System) Control Module
Purpose
The AFS control module calculates the target optical axis based on the vehicle
height signal and outputs the target optical axis signal to the headlight leveling
actuator.
Function
The AFS control module performs control of the AFS and headlight auto leveling.
...
Water Pump Removal/Installation
WARNING:
Never remove the cooling system cap or loosen the radiator drain plug while
the engine is running, or when the engine and radiator are hot. Scalding engine
coolant and steam may shoot out and cause serious injury. It may also damage
the engine and cooling system.
Tu ...
