Mazda CX-5 Service & Repair Manual: Relay And Fuse Block Disassembly/Assembly
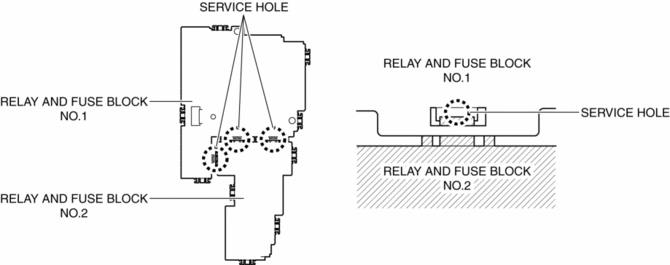
1. Insert a tape-wrapped flathead screwdriver into the service hole in the position shown in the figure.
2. Move the flathead screwdriver in the direction of the arrow (1) shown in the figure, pull up relay and fuse block No.1 in the direction of the arrow (2) shown in the figure, and detach the relay and fuse block No.2 tab from relay and fuse block No.1.
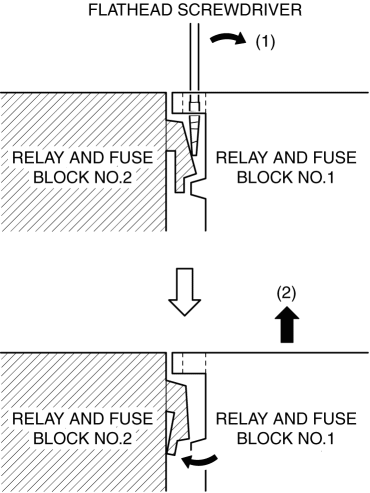
3. Detach all the relay and fuse block No.2 tabs from relay and fuse block No.1, and remove relay and fuse block No.1 from relay and fuse block No.2.
4. Assemble in the reverse order of disassembly.
 Relay And Fuse Block
Purpose
Relays and fuses used by each system are grouped and housed together for
smooth inspection and replacement servicing.
Function
Relays and fuses used by each system are g ...
 Relay And Fuse Block Middle Cover Disassembly/Assembly
1. Insert a tape-wrapped flathead screwdriver into the service hole in the position
shown in the figure.
2. While pressing the relay and fuse block middle cover tab in the direction
of arrow ...
Other materials:
Rear Body Control Module (Rbcm) Removal/Installation
CAUTION:
If configuration is not performed when the rear body control module (RBCM)
is replaced with a new one, the vehicle specification information is not stored
in the rear body control module (RBCM) and the system will not operate normally.
When performing configuration, it ...
Steering Switch Inspection
Without Bluetooth system
WARNING:
Handling the driver-side air bag module improperly can accidentally operate
(deploy) the air bag module, which may seriously injure you. Read the service
warnings and cautions before handling the air bag module..
1. Switch the ignition OFF (LOCK ...
Front Fog Light Removal/Installation
1. Disconnect the negative battery cable..
2. Remove the screws and bolt.
3. Pull up the front under cover No.1 and remove the mudguard screw shown in
the figure.
4. Disconnect the connector.
5. While pressing the clip tab in the direction of the arrow (1) shown in the
figure ...
