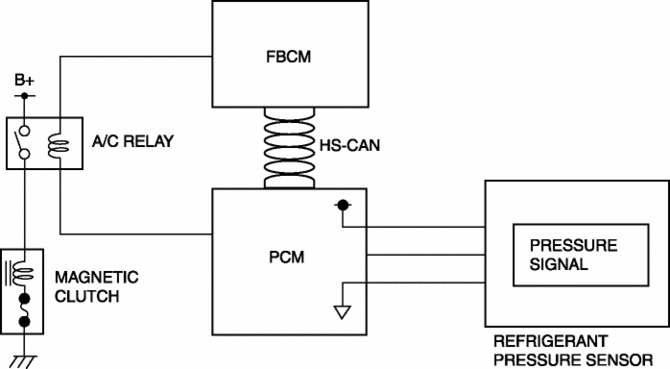
Mazda CX-5 Service & Repair Manual: Refrigerant Pressure Sensor [Manual Air Conditioner]
Purpose
-
The refrigerant pressure sensor detects the refrigerant pressure in the refrigerant cycle.
Function
-
The refrigerant pressure sensor converts the detected refrigerant pressure to an electric signal and sends it to the PCM.
Construction
-
The refrigerant pressure sensor is installed on the cooler pipe.
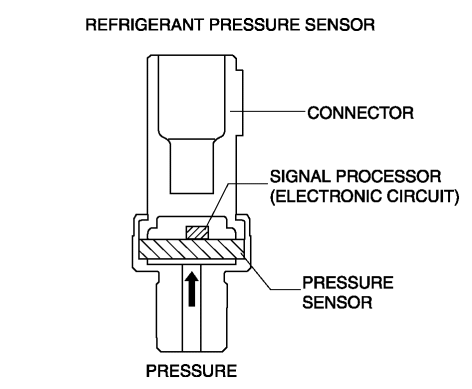
-
A capacitance type refrigerant pressure sensor, which converts refrigerant pressure into a linear electric signal, has been adopted.
-
Consists of a pressure detecting part and signal processing part.
-
The pressure detecting part is a variable capacity condenser, which changes capacitance according to the pressure.
-
The signal processing part detects the capacitance of pressure detecting part, converts it to voltage, then outputs it to the climate control unit.
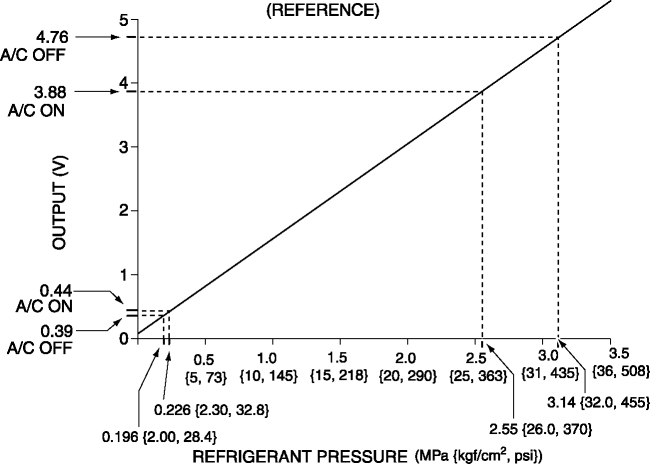
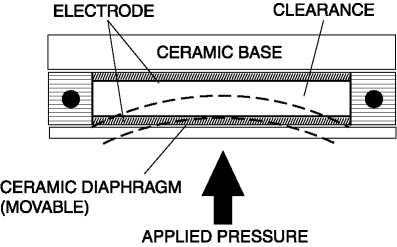
Operation
Capacitance type
-
There is a clearance between the movable ceramic diaphragm and the ceramic base, and each side has an electrode.
-
When pressure is applied from the ceramic diaphragm side, the ceramic diaphragm deforms, and the clearance between the electrodes changes. As a result, capacitance is changed and pressure is detected.
Fail-safe
-
Function not equipped.
 Refrigerant Pressure Sensor [Full Auto Air Conditioner]
Purpose
The refrigerant pressure sensor detects the refrigerant pressure in the refrigerant
cycle.
Function
The refrigerant pressure sensor converts the detected refrigerant pre ...
 Engine Assembly
...
Other materials:
Lower Cowl Side Reinforcement Installation [Panel Replacement]
Symbol Mark
Installation Procedure
1. When installing new parts, measure and adjust the body as necessary to conform
with standard dimensions.
2. Drill holes for the plug welding before installing the new parts.
3. After temporarily installing new parts, make sure the related parts fit p ...
Rear ABS Wheel Speed Sensor Inspection [Awd]
Installation Visual Inspection
1. Inspect the following items:
If there is any malfunction, replace the applicable part.
a. Excessive play of the ABS wheel-speed sensor
b. Deformation of the ABS wheel-speed sensor
c. Deformation or damage of the ABS sensor rotor
Clearance Inspec ...
Automatic Transaxle Warning Light [Fw6 A EL, Fw6 Ax EL]
Purpose/Function
The automatic transaxle warning light illuminates when the transaxle has
malfunction.
Construction
The automatic transaxle warning light is built into the instrument cluster.
Operation
If the transmission has a malfunction, the TCM sends an ...
