Mazda CX-5 Service & Repair Manual: Refrigerant Line Removal/Installation
1. Disconnect the negative battery cable..
2. Discharge the refrigerant..
3. Disconnect the engine ground.
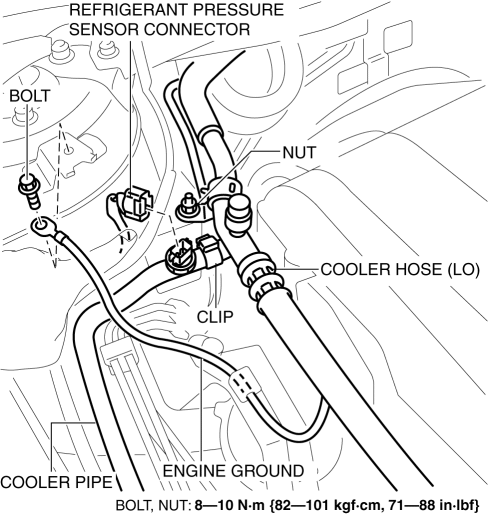
4. Disconnect the refrigerant pressure sensor connector.
5. Remove in the order indicated in the table. Do not allow compressor oil to spill.
CAUTION:
-
If moisture or foreign material enters the refrigeration cycle, cooling ability will be lowered and abnormal noise will occur. Always immediately plug all open fittings after removing any refrigeration cycle parts to keep moisture or foreign material out of the cycle.
|
1 |
Cooler hose (HI) . |
|
2 |
Cooler hose (LO) . |
|
3 |
Cooler pipe . |
6. Install in the reverse order of removal.
7. Perform the refrigerant system performance test..
Refrigerant Line Installation Note (1)
1. Apply compressor oil to the O-rings and connect the joints.
2. Tighten the joints.
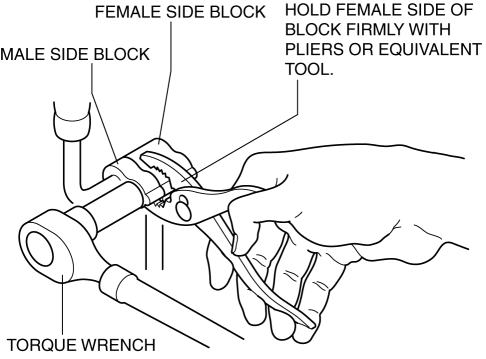
Block joint type
1. Tighten the joint bolt by hand.
2. Connect the block joint type pipes by grasping the female side of the block with pliers or similar tool and holding firmly, then tighten the connection bolt or nut with a torque wrench.
Refrigerant Line Installation Note (2)
1. After replacing the refrigerant line, add compressor oil to the refrigeration cycle.
-
After replacing the cooler hose (HI)
-
1 ml {1 cc, 0.03 fl oz}
-
Supplemental oil amount (approx. quantity)
-
After replacing the cooler hose (LO)
-
3 ml {3 cc, 0.1 fl oz}
-
Supplemental oil amount (approx. quantity)
-
After replacing the cooler pipe
-
1 ml {1 cc, 0.03 fl oz}
-
Supplemental oil amount (approx. quantity)
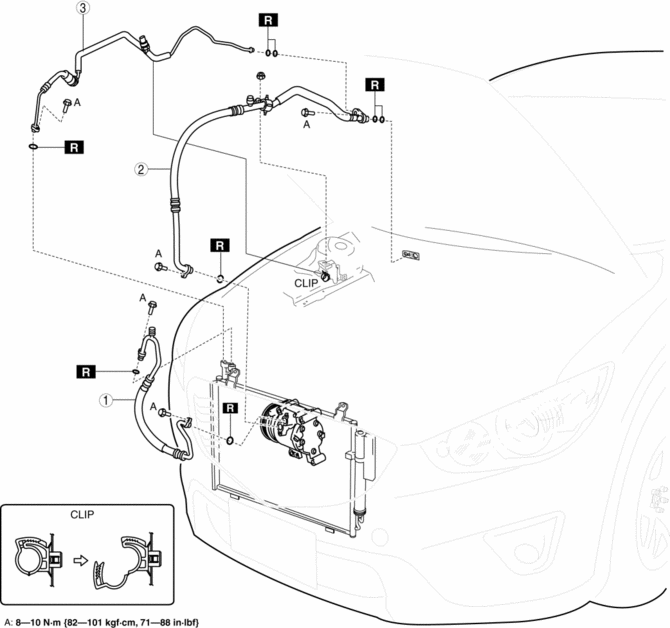
 Refrigerant Line
Purpose
The system piping connects each related part of the refrigerant system.
Construction
Block-type piping has been adopted to the pipe connection, improving the
efficiency ...
 Refrigerant Pressure Check
NOTE:
Measure the refrigerant pressure after approx.10 min have elapsed
from engine start.
1. Install the manifold gauge..
2. Start the engine and warm it up.
3. Set the fan speed ...
Other materials:
Passenger Compartment Temperature Sensor [Full Auto Air Conditioner]
Purpose
The passenger compartment temperature sensor detects the cabin temperature.
Function
The passenger compartment temperature sensor converts the detected temperature
to an electric signal.
Construction
A thermistor-type passenger compartment temperature sens ...
DSC HU/CM Removal/Installation
WARNING:
If the DSC HU/CM configuration is not completed, it could result in an unexpected
accident due to the DSC being inoperative. If the DSC HU/CM is replaced, always
use the automatic configuration function so that the DSC operation conditions
are correct.
If the DSC re ...
Intake Air Temperature (Iat) Sensor Inspection
IAT Sensor No.1
Resistance inspection
NOTE:
Because the IAT sensor No.1 is integrated in the MAF sensor, replacing the
IAT sensor No.1 includes replacement of the MAF sensor/IAT sensor No.1.
1. Disconnect the negative battery cable..
2. Disconnect the MAF sensor/IAT sensor No.1 ...
