Mazda CX-5 Service & Repair Manual: Rear Wiper Motor Removal/Installation
1. Disconnect the negative battery cable..
2. Remove the following parts:
a. Rear wiper arm and blade.
b. Liftgate upper trim.
c. Liftgate side trim.
d. Liftgate recess.
e. Liftgate lower trim.
3. Remove the rear wiper motor connector.
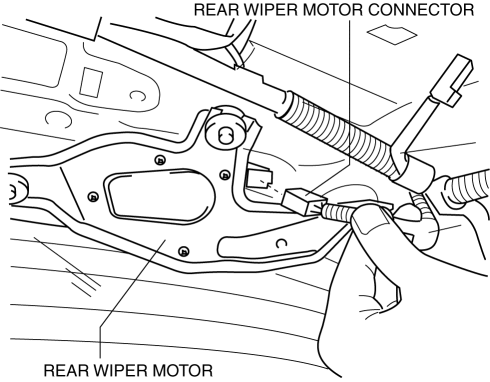
4. Remove bolts shown in the figure.
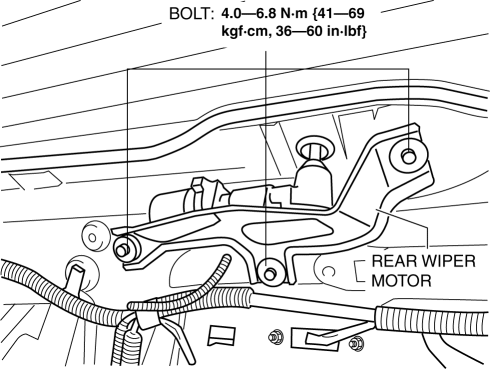
5. Pull out the rear wiper motor from the outer bushing hole and remove it.
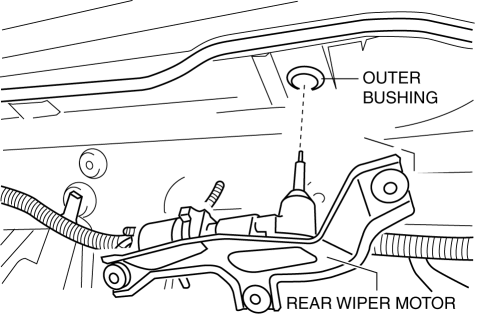
6. Press in the outer bushing from the outside of the liftgate in the direction of the arrow (1) shown in the figure.
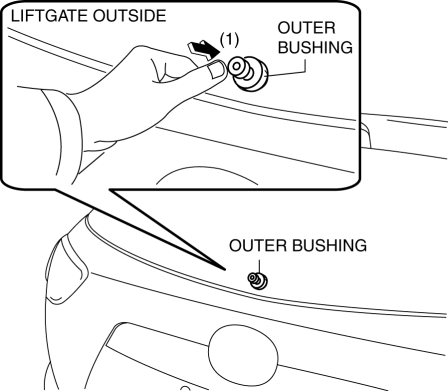
7. Detach the liftgate and outer bushing while pressing the outer bushing in the direction of the arrows shown in the figure, pull the outer bushing from the inside of the liftgate in the direction of the arrow (2), and remove it.
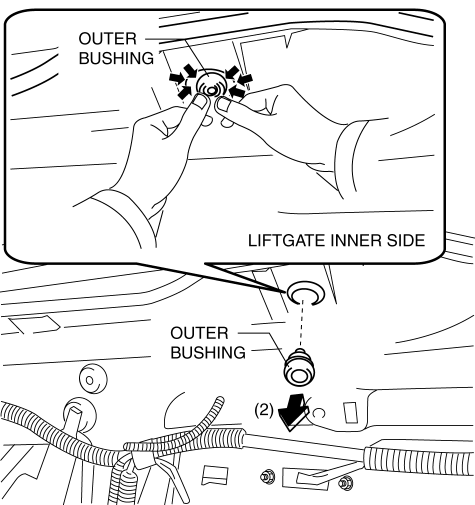
8. Install in the reverse order of removal.
 Rear Wiper Motor Inspection
1. Disconnect the negative battery cable..
2. Open the liftgate.
3. Remove the following parts:
a. Rear wiper arm and blade.
b. Liftgate upper trim.
c. Liftgate side trim.
d. Liftgate rece ...
 Rear Wiper System
Outline
Equipped with continuous, auto-stop, intermittent wiper, and synchronized
washer and wiper operation.
The front body control module (FBCM) performs rear wiper and washer syst ...
Other materials:
Liftgate Side Trim Removal/Installation
1. Remove the liftgate upper trim..
2. Remove the fastener A.
3. Take the shaded area shown in the figure, and pull the liftgate side trim
in the direction of the arrow (1) while detaching clips B.
4. Take the shaded area shown in the figure, detach tabs C while pulling the
liftgate si ...
Air Intake Control [Full Auto Air Conditioner]
Purpose
The air intake control switches the air intake port (FRESH/REC) according
to the vehicle environment.
Function
The air intake control drives the air intake actuator and switches the air
intake door position according to the operations of the REC, FRESH and defroster ...
Magnetic Clutch Disassembly/Assembly [Full Auto Air Conditioner]
1. Disassemble in the order indicated in the table.
1
Bolt
(See Bolt Removal/Installation Note.)
2
Pressure plate
3
Shim
(See Shim Installation Note.)
4
Snap ring
(See Snap Ring ...
