Mazda CX-5 Service & Repair Manual: Rear Washer Nozzle Removal/Installation
1. Disconnect the negative battery cable..
2. Remove the liftgate upper trim..
3. Remove the rear spoiler..
4. Disconnect the rear washer hose from the rear washer nozzle..
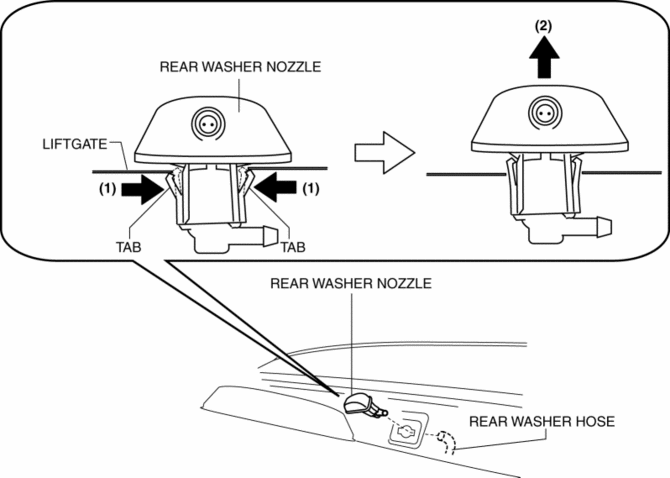
5. While pressing tabs of the rear washer nozzle in the direction of the arrows (1) shown in the figure, pull the rear washer nozzle in the direction of the arrow (2) to remove it from the liftgate.
6. Install in the reverse order of removal.
7. Adjust the rear washer nozzle..
 Rear Washer Nozzle Adjustment
CAUTION:
If the nozzle angle is adjusted with excessive force by strongly inserting
a needle or similar thin tool into the injection nozzle of rear washer nozzle,
it could damage the noz ...
 Washer Motor Inspection
1. Disconnect the negative battery cable..
2. Set the front over fender aside..
3. Set the mudguard (RH) aside..
4. Remove the front bumper..
5. Disconnect the washer motor connector from the ...
Other materials:
Blind Spot Monitoring (Bsm) Control Module Inspection
1. Disconnect the negative battery cable..
2. Remove the rear combination light..
3. Remove the rear bumper..
4. Connect the negative battery cable..
5. Verify that the voltages of each of the terminals are as indicated in the
terminal voltage table (reference).
If the voltage is n ...
Child-Restraint System Installation
Child-Restraint System Types
In this owner's manual, explanation of child-restraint systems is provided for
the following three types of popular childrestraint systems: infant seat, child
seat, booster seat.
NOTE
• Installation position is determined
by the type of child-restraint sys ...
Engine Oil Pressure Warning Light
Purpose
The engine oil pressure warning light warns the driver that the engine oil
level is insufficient.
Function
When the instrument cluster receives the engine oil pressure warning light
request signal sent from the PCM via the CAN signal, it illuminates the engine
oi ...
