Mazda CX-5 Service & Repair Manual: Rear Side Frame Removal [Panel Replacement]
Symbol Mark

Removal Procedure
NOTE:
-
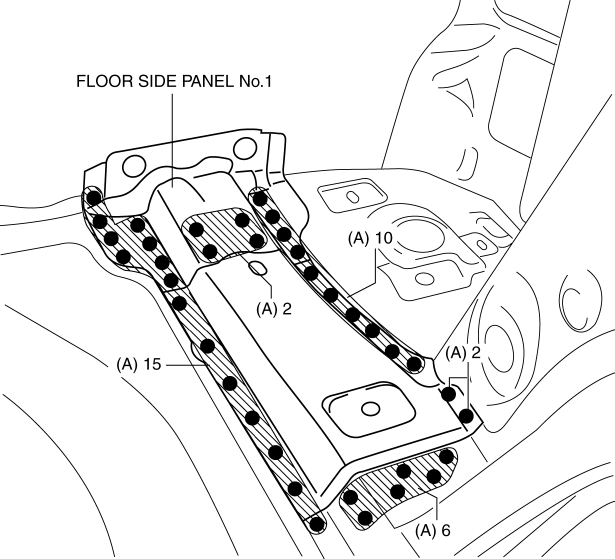
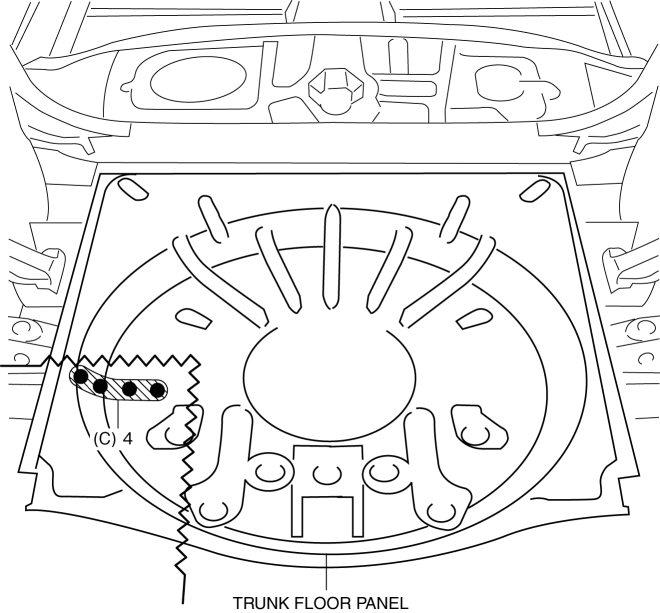
When drilling the 35 locations indicated by (A) and 4 locations indicated by (C) shown in the figure, do not drill a hole all the way through or there could be a problem when installing the new part.
1. Drill the 35 locations indicated by (A) shown in the figure, then remove the floor side panel No.1.
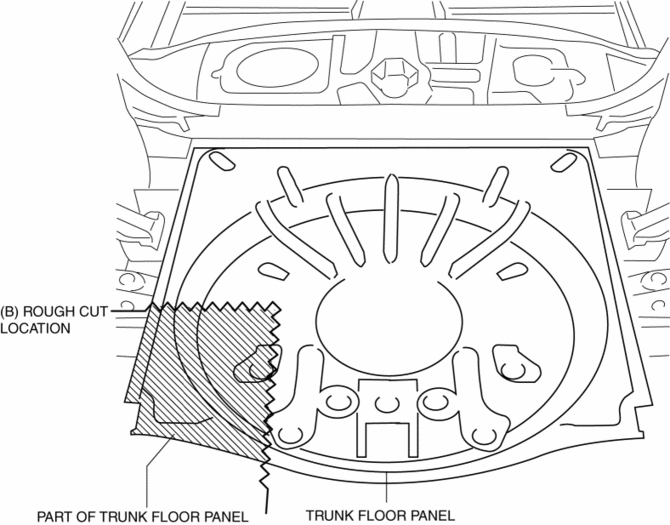
2. Rough cut area location indicated by (B) shown in the figure.
3. Drill the 4 locations indicated by (C) shown in the figure, then remove the part of trunk floor panel.
4. Drill the 8 locations indicated by (D) shown in the figure.

5. Remove the rear side frame.
 Rear Side Frame Installation [Panel Replacement]
Symbol Mark
Installation Procedure
1. When installing new parts, measure and adjust the body as necessary to conform
with standard dimensions.
2. Drill holes for the plug welding before inst ...
 Room Straight Line Dimensions (1) [Dimensions]
Point symbol
Designation
Hole diameter or bolt or nut size mm {in}
A
Front pillar inner datum hole
?7 {0.3}
...
Other materials:
Front Drive Shaft Inspection
1. Inspect the connections for any looseness.
If there is any malfunction, tighten or replace the applicable part.
2. Inspect the dust boot for damage and cracks.
If there is any malfunction, replace the applicable part.
3. Move the spline and joint up and down, left ...
Throttle Position (TP) Sensor
Purpose/Function
Detects the throttle valve opening/closing condition, which operates in accordance
with the accelerator pedal operation, as basic information for mainly determining
the fuel injection amount.
Detects the throttle valve opening/closing condition, which operates i ...
Electric Variable Valve Timing Motor/Driver Inspection
WARNING:
A hot engine can cause severe burns. Turn off the engine and wait until it
is cool before servicing.
CAUTION:
Do not disassemble the electric variable valve timing motor/driver because
it is a precision unit.
Do not apply excessive force when rotating the ...
