Mazda CX-5 Service & Repair Manual: Rear Seat Cushion Removal/Installation
CAUTION:
-
When removing or putting in the rear seat cushion, contact with the surrounding areas of the vehicle could cause scratches and damage. When removing or putting in the rear seat cushion, always use two or more persons to perform the work and be careful not to scratch or damage the rear seat cushion and the surrounding area of the vehicle.
-
When performing the procedure with a rear seat cushion removed from the vehicle, perform the procedure on a clean cloth so as not to damage or soil the seat.
6:4 Split Type
1. Detach tabs A in the direction of the arrow (1) shown in the figure while lifting cover A in the direction of the arrow (2), detach hook B, and then remove cover A.
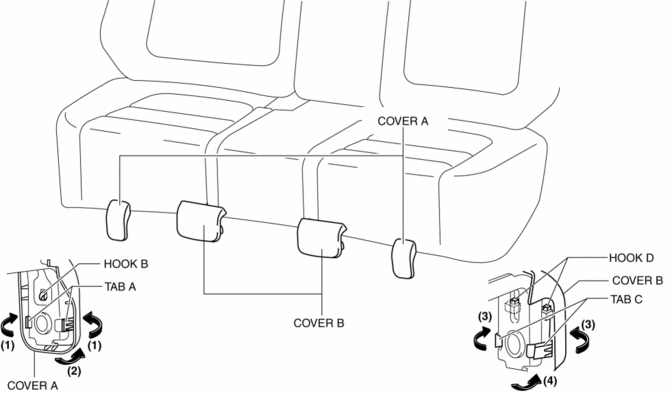
2. Detach tabs C in the direction of the arrow (3) shown in the figure while lifting cover B in the direction of the arrow (4), detach hook D, and then remove cover B.
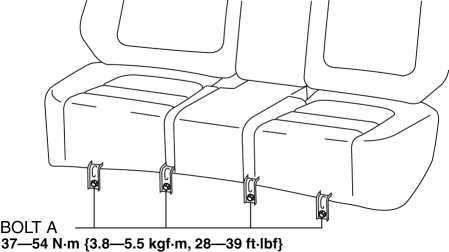
3. Remove bolts A.
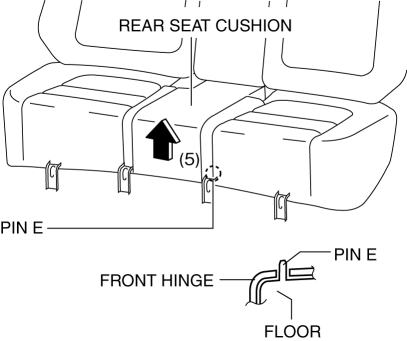
4. Lift up the rear seat cushion in the direction of the arrow (5) shown in the figure and set the pin E aside from the front hinge.
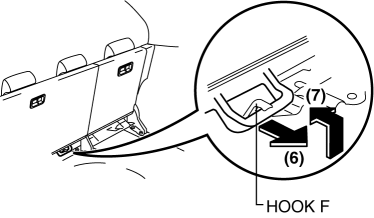
5. Move the rear seat cushion in the direction of the arrow (6), (7) shown in the figure and set the hook F aside.
6. Remove the rear seat cushion.
7. Install in the reverse order of removal.
WARNING:
-
If the hook and wire are not locked, the seat may move during a collision and the occupant may be injured. After installing the rear seat cushion, verify that the hook and wire are locked.
4:2:4 Split Type
1. Remove the trunk board..
2. Remove the rear seat..
3. Remove bolts A.

4. Remove the rear seat cushion.
5. Install in the reverse order of removal.
 Rear Seat Center Armrest Removal/Installation
1. Operate the push knob (RH) and lower the rear seat back (RH).
2. Remove screw A.
3. Remove the rear seat center armrest hinge cover (RH) in the direction of the
arrow (1) shown in the fig ...
 Rear Seat Cushion Trim Removal/Installation
CAUTION:
When removing or putting in the rear seat cushion, contact with the surrounding
areas of the vehicle could cause scratches and damage. When removing or putting
in the rear seat ...
Other materials:
PCM
Purpose/Function
High-level driveability and lower fuel consumption have been realized by
controlling the appropriate engine conditions (fuel injection/ignition timing)
according to operation conditions.
Controls each output part based on the signal from each input part.
...
Connecting Rod, Connecting Rod Bearing
Purpose, Function
Connecting rod
The connecting rod transmits the reciprocating movement of the piston to
the crankshaft by engaging the piston pin and crank pin.
Connecting rod bearing
The connecting rod bearing forms an oil film on the outer surface of the
crank pin to p ...
B Pillar Upper Trim Removal/Installation
1. Remove the following parts:
a. Front scuff plate.
b. Rear scuff plate.
c. B-pillar lower trim.
d. Adjuster anchor cover.
e. Upper anchor installation bolts on the front seat belt.
2. Partially peel back the seaming welt.
3. Take the shaded area shown in the figure, and pull the B-pi ...
