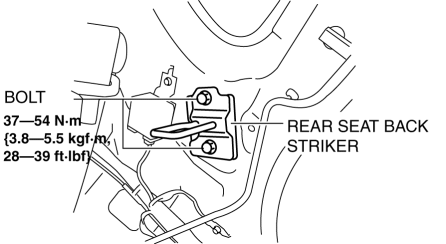
Mazda CX-5 Service & Repair Manual: Rear Seat Back Striker Removal/Installation
1. Disconnect the negative battery cable..
2. Press the push knob to fold the rear seat back.
3. Remove the following parts:
a. Trunk board.
b. Trunk end trim.
c. Rear scuff plate.
d. Trunk side trim.
4. Remove the bolts.

5. Remove the rear seat back striker.
6. Install in the reverse order of removal.
 Rear Seat Back Removal/Installation
CAUTION:
When removing or putting in the rear seat, contact with the surrounding areas
of the vehicle could cause scratches and damage. When removing or putting in
the rear seat, always ...
 Rear Seat Back Trim Removal/Installation
6:4 Split Type
1. Remove the trunk board..
2. Remove the rear seat back..
3. Remove the headrest.
4. Remove the rear seat back frame..
5. Remove the C rings in the order of (1), (2), (3), and ...
Other materials:
High Pressure Fuel Pump
Purpose, Function
Applies pressure to fuel sent from the fuel pump equipped on the fuel tank,
and then pumps it to the fuel delivery pipe.
Fuel is sectioned and pumped by the up and down movement of the piston caused
by the rotation of the cam installed to the rear end of the ex ...
Condenser
Purpose
The condenser cools the high-temperature, highly pressurized refrigerant.
Function
The condenser cools the high-temperature, highly pressurized gaseous refrigerant
compressed by the A/C compressor using the outside air, and changes it to liquid
refrigerant.
Co ...
Roof Molding Removal
1. Insert a tape-wrapped flathead screwdriver in the position shown in the figure.
2. Rotate a tape-wrapped flathead screwdriver in the direction of the arrow in
the order of (1), (2) shown in the figure and remove the roof molding from the front
T-stud.
3. Rotate the roof molding in th ...
