Mazda CX-5 Service & Repair Manual: Rear Scuff Plate Removal/Installation
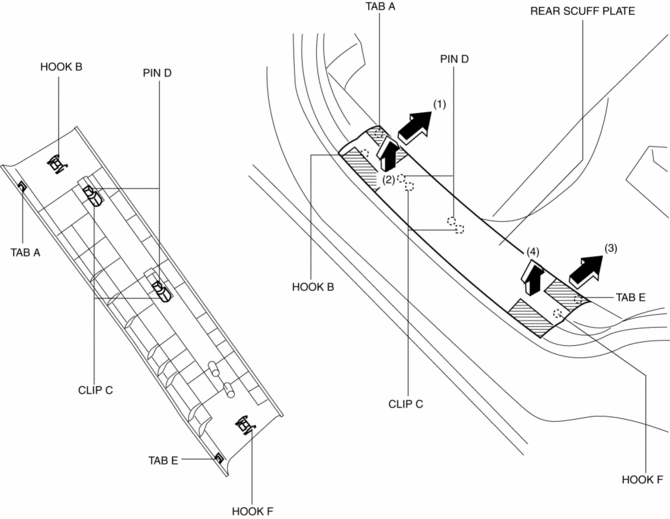
1. Take the shaded area shown in the figure, detach tab A while pulling the rear scuff plate in the direction of the arrow (1) shown in the figure, then detach hook B, clips C, pins D while pulling in the direction of the arrow (2).
2. Take the shaded area shown in the figure, detach tab E while pulling the rear scuff plate in the direction of the arrow (3) shown in the figure, then detach the hook F while pulling in the direction of the arrow (4).

3. Install in the reverse order of removal.
 Procedure [Plastic Body Parts]
Repair of polypropylene bumpers having damage that has reached the surface of
the polypropylene and are too serious to be restored by painting only.
1. Cut the rough edges around the damage wit ...
 Repairable Range Of Polypropylene Bumpers [Plastic Body Parts]
The three types of damaged bumpers shown below are considered repairable. Although
a bumper which has been damaged greater than this could also be repaired, it should
be replaced with a new one be ...
Other materials:
Magnet Clutch [Manual Air Conditioner]
Purpose
The magnetic clutch transmits the rotation force from the engine to the shaft
in the A/C compressor.
Function
The magnetic clutch engages or disengages the magnetic clutch and the A/C
turns on or off by switching the power transmission from the engine.
Con ...
Rear Upper Arm Removal/Installation [2 Wd]
WARNING:
Verify that the crossmember is securely supported by a jack. If the rear
crossmember falls off, it can cause serious injury or death, and damage to the
vehicle.
CAUTION:
Performing the following procedures without first removing the rear ABS wheel-speed
...
Powertrain System [C66 M R]
Purpose, Function
The powertrain mechanism changes the gear combination by engaging or releasing
the clutch hub and gear, and changes the power transmission route. Because of
the change in the power transmission route, the drive force (speed, torque,
rotation direction) input from th ...
