Mazda CX-5 Service & Repair Manual: Rear Sash Molding Installation
WARNING:
-
Using a utility knife with bare hands can cause injury. Always wear gloves when using a utility knife.
NOTE:
-
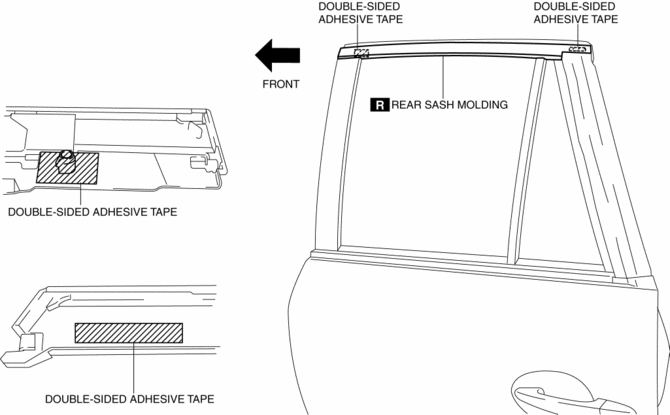
Double-sided adhesive tape has already been attached to the new rear sash molding.
1. When installing a new rear sash molding, follow the procedure below:
a. Carefully remove the adhesive remaining on the body using a razor blade.
b. Remove any grease or dirt from the adhesion surface of the body.
2. Remove the adhesive remaining on the rear sash molding and the body using a razor blade.
a. Remove any grease or dirt from the adhesion surface of the rear sash molding and the body.
b. Apply primer to the bonding area of the rear sash molding.
c. Affix double-sided adhesive tape to the rear sash molding as shown in the figure.

NOTE:
-
As for the double-sided adhesive tape, use 3M GT7120 or equivalent.
3. Peel off the backing of the double-sided adhesive tape.
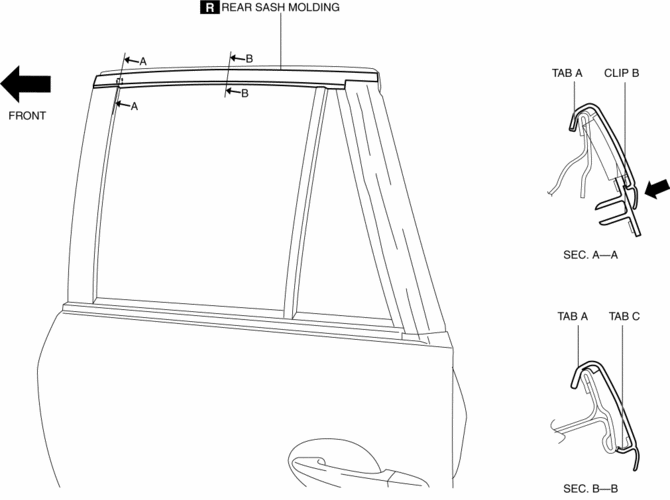
4. Hook tab A to the body in the position where clip B aligns with the sash holes.

5. Press the rear sash molding in the direction of the arrow and install clip B to the body.
CAUTION:
-
Do not press the rear sash molding in any place other than the rubber areas.
6. Press the rear sash molding from the vehicle front in the direction of the arrow and install tab C.
NOTE:
-
After installing the rear sash molding, verify that tabs A and C are connected properly to the body.
 Rear Over Fender Removal/Installation
1. Remove fasteners A.
2. Pull the rear over fender in the direction of the arrow while removing clips
B.
3. Install in the reverse order of removal. ...
 Rear Sash Molding Removal
WARNING:
Using a utility knife with bare hands can cause injury. Always wear gloves
when using a utility knife.
1. Remove the rear door garnish. (rear side).
2. Remove the double-si ...
Other materials:
Front ABS Wheel Speed Sensor Removal/Installation
1. Remove the mudguard..
2. Remove in the order indicated in the table.
3. Install in the reverse order of removal.
4. After installation, verify that there is no twisting in the front ABS wheel-speed
sensor.
1
Connector
2
Bolt
...
Master Cylinder
Purpose/Function
With the adoption of the master cylinder having an enlarged diameter (20.64
mm {0.8126 in}), brake pedal operability has been improved.
For vehicles with DSC, the diameter of the pipe between the master cylinder
and the DSC HU/CM has been increased, improving re ...
Windshield Wiper Arm And Blade Adjustment
1. Switch the ignition ON (engine off or on).
2. Operate the windshield wiper at low speed.
3. Verify that the windshield wiper operates at low speed and stop the windshield
wiper.
4. Verify that the windshield wiper stops at the auto-stop position.
5. Remove the windshield wiper arm and b ...
