Mazda CX-5 Service & Repair Manual: Rear Lower Arm Removal/Installation
WARNING:
-
Be careful not to allow the coil spring to fly off when removing/installing the coil spring. Otherwise, the coil spring could fly off and cause serious injury or death, or damage to the vehicle.
1. When working on the left side of the vehicle, disconnect the auto leveling sensor link..
2. Remove in the order indicated in the table.
3. Install in the reverse order of removal.
4. Inspect the wheel alignment and adjust it if necessary..
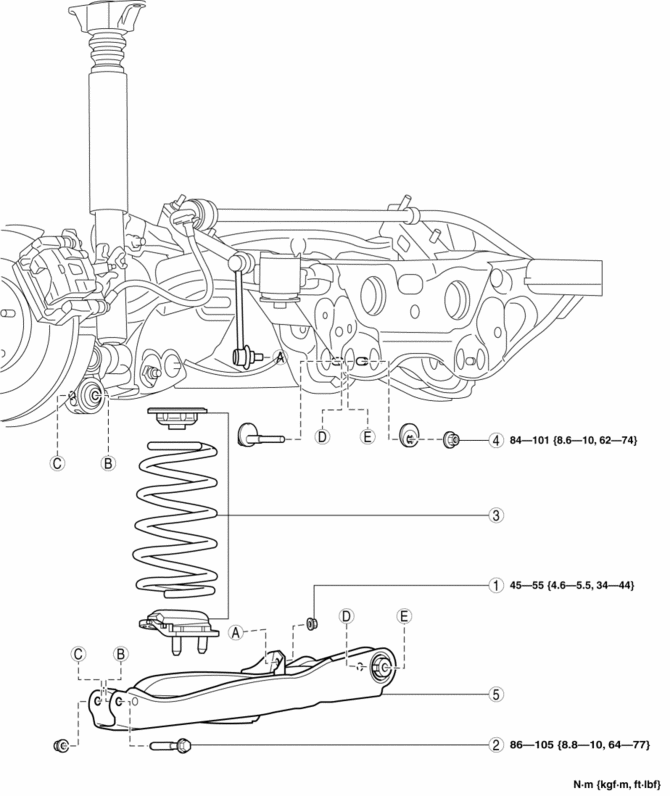
|
1 |
Rear stabilizer control link lower side nut (See REAR STABILIZER REMOVAL/INSTALLATION [2WD].) (See REAR STABILIZER REMOVAL/INSTALLATION [AWD].) |
|
2 |
Rear lower arm outer bolt (See Rear Lower Arm Outer Bolt Removal Note.) (See Rear Lower Arm Outer Bolt Installation Note.) |
|
3 |
Rear coil spring component (See REAR COIL SPRING REMOVAL/INSTALLATION.) |
|
4 |
Rear lower arm inner nut |
|
5 |
Rear lower arm |
Rear Lower Arm Outer Bolt Removal Note
1. Support the rear lower arm using a jack.
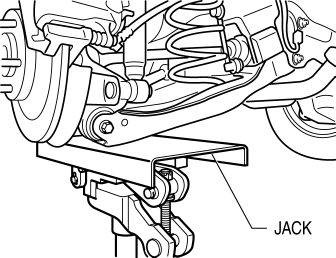
2. Remove the rear lower arm outer bolt.
Rear Lower Arm Outer Bolt Installation Note
1. Position the jack under the rear lower arm and jack up slowly.
2. Align the upper end of the rear coil spring with the step of the upper spring seat rubber.
3. Align the lower end of the rear coil spring with the step of the lower spring seat rubber.
4. Install the lower arm outer bolt.
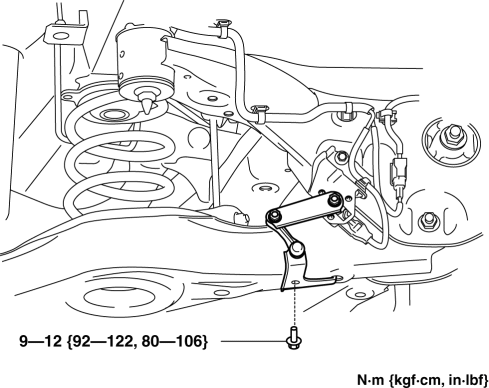
 Rear Lateral Link Removal/Installation
1. Disconnect the rear stabilizer control link lower side nut..
2. Remove in the order indicated in the table.
3. Install in the reverse order of removal.
4. Inspect the wheel alignment an ...
 Rear Shock Absorber Disposal
WARNING:
Whenever drilling into a rear shock absorber, wear protective eye wear. The
gas in the rear shock absorber is pressurized, and could spray metal chips into
the eyes and face w ...
Other materials:
Intake Air Temperature (Iat) Sensor
IAT Sensor No.1
Purpose/Function
Detects the IAT before it passes through the throttle body as basic information
for mainly determining the fuel injection amount.
Detects the IAT before it passes through the throttle body and inputs it
to the PCM as an IAT signal.
Constru ...
High Mount Brake Light Removal/Installation
1. Disconnect the negative battery cable..
2. Remove the liftgate upper trim..
3. Remove the rear spoiler..
4. Disconnect the connector.
5. While pressing the high-mount brake light tab in the direction of arrow (1)
shown in the figure, press the high-mount brake light in the direction ...
Liquid Crystal Display (LCD)
Outline
The LCD displays vehicle information in the instrument cluster.
The instrument cluster performs LCD fail-safe..
Function/Construction
The instrument cluster configures the indication of the LCD based on the
CAN signals sent from the related modules and displays ...
