
Mazda CX-5 Service & Repair Manual: Rain Sensor
Outline
-
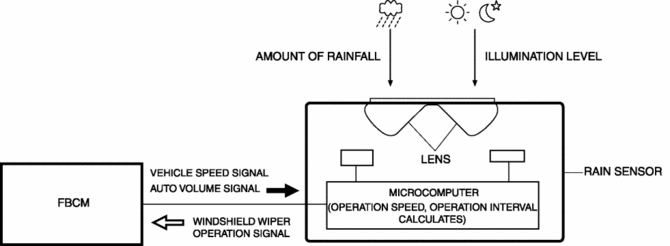
The rain sensor detects the amount of rainfall and calculates the wiper operation speed, and outputs a windshield wiper control signal to the front body control module (FBCM) to perform automatic wiper operation (auto wiper system) according to the amount of rainfall.
-
The front body control module (FBCM) performs rain sensor fail-safe..
Function
Rainfall Amount Detection Function
CAUTION:
-
If the windshield is under any of the following conditions, the rain sensor cannot detect the amount of rainfall correctly and the windshield wipers operate incorrectly.
-
Stickers or labels are adhered to the rain sensor detection area in the upper part of the windshield.
-
The rain sensor detection area in the upper part of the windshield is dirty.
-
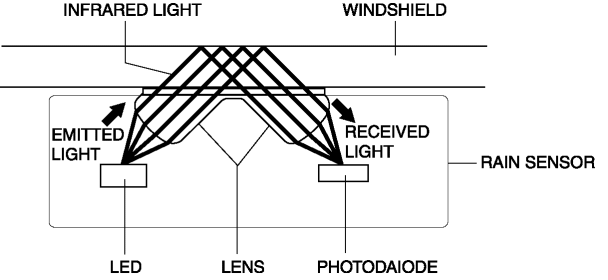
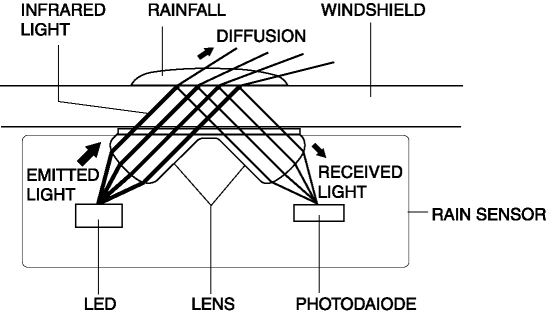
The rain sensor emits infrared light from the internal LED, and the infrared light is reflected off the windshield via the lens and received by the photodiode in the rain sensor.
-
If the rate of reflected infrared light is reduced, it is determined that rain is contacting the windshield, and the amount of rainfall is calculated based on the reduction level of the reflection rate. The calculated amount of rainfall is used for operating the wipers at the optimal speed.
Initial Setting Function
-
When the ignition is switched ON (engine off or on), the rain sensor detects and records the transparency of the windshield surface, which varies depending on wear and accumulation of dust. As a result, the rain sensor determines the optimal speed (LO/HI) for the windshield wipers and sends the windshield wiper operation signal to the front body control module (FBCM).
-
The initial setting is performed everytime the ignition is switched ON (engine off or on).
Sensitivity Adjustment Function
-
While the auto wiper is operating, sensitivity of the rain sensor can be optionally adjusted by operating the sensitivity adjustment volume on the wiper and washer switch which changes the volume signal input to the front body control module (FBCM).
-
Sensitivity of the rain sensor can be adjusted between 1 (low sensitivity) and 5 (high sensitivity) by operating the sensitivity adjustment volume according to the conditions such as rain intensity.
-
While the auto wiper is operating, the sensitivity of the rain sensor is adjusted automatically according to the vehicle signal sent from the PCM via the front body control module (FBCM).
-
While the auto wiper is operating, the rain sensor (auto light sensor) detects the illumination level above and in front of the vehicle. When the rain sensor detects an illumination level higher than a level required for turning on the TNS, the sensitivity of the rain sensor increases.
On-board diagnostic function
-
The rain sensor performs on-board diagnostics when the ignition is switched ON (engine off or on). If a malfunction is detected in the rain sensor, an error signal is sent to the front body control module (FBCM). The front body control module (FBCM) outputs DTCs based on error signals from the rain sensor.
-
For details on DTCs, refer to the diagnostic system (FBCM), DTC table (FBCM) in the Workshop Manual.
Construction
-
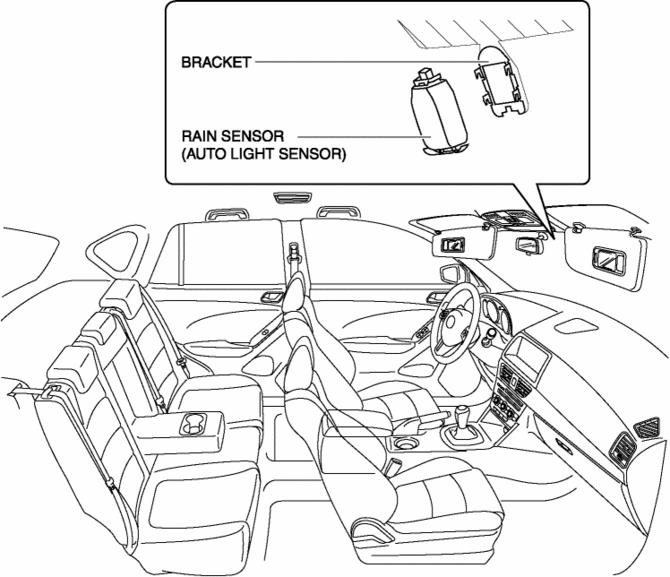
The rain sensor is installed to the bracket in the upper center part of the windshield.
-
The rain sensor is integrated with the auto light sensor.
-
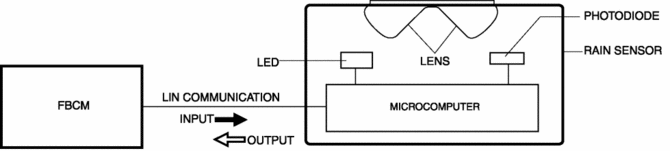
The rain sensor consists of the lens, LED, photodiode, and microcomputer, and sends/receives signals between the front body control module (FBCM) using LIN communication.
Operation
Operation With No Rainfall Contacting Windshield
1. Infrared light is emitted from the LED in the rain sensor towards the windshield.
2. The emitted infrared light reflects off the windshield.
3. The infrared light reflected off the windshield is received by the photodiode in the rain sensor.
4. When the photodiode receives the light, the microcomputer in the rain sensor calculates the rainfall amount from the reflection rate, and sends a windshield wiper control signal to the front body control module (FBCM).
Operation with Rainfall Contacting Windshield
1. Infrared light is emitted from the LED in the rain sensor towards the windshield.
2. Emitted infrared light goes through the windshield and penetrates the rain drops on the windshield.
3. The infrared light which cannot penetrate is reflected off the windshield and is received by the photodiode in the rain sensor.
4. When the photodiode receives the light, the microcomputer in the rain sensor calculates the rainfall amount from the reflection rate, converts this to an electrical signal and sends a windshield wiper control signal to the front body control module (FBCM).
Fail-safe
-
Function not equipped.
 Wiper Bracket Removal [Panel Replacement]
Symbol Mark
Installation Procedure
1. When installing new parts, measure and adjust the body as necessary to conform
with standard dimensions.
2. Drill holes for the plug welding before inst ...
 Rain Sensor Removal/Installation
1. Disconnect the negative battery cable..
2. Spread open the rain sensor cover in the direction of the arrows (1) and disengage
tabs A to remove it.
3. Disconnect the rain sensor connector ...
Other materials:
Room Straight Line Dimensions (1) [Dimensions]
Point symbol
Designation
Hole diameter or bolt or nut size mm {in}
A
Front pillar inner datum hole
?7 {0.3}
B
Front pillar inner datum hole
?7 {0.3}
C
...
Sas Control Module Removal/Installation [Standard Deployment Control System]
WARNING:
Handling the SAS control module or air bag module improperly can accidentally
deploy the air bag modules and pre-tensioner seat belts, which may seriously
injure you. Read the air bag system service warnings and cautions before handling
the air bag module..
If the c ...
Tires
For reasons of proper performance, safety, and better fuel economy, always maintain
recommended tire inflation pressures and stay within the recommended load limits
and weight distribution.
WARNING
Using Different Tire Types:
Driving your vehicle with different types of tires is dangerous. It ...
