Chevrolet Spark manuals

Mazda CX-5 Service & Repair Manual: Power Window System Preliminary Inspection [Power Window System]

Mazda CX-5 Service & Repair Manual / Body / Glass & Windows / Power Window System Preliminary Inspection [Power Window System]

Manual Open/Close Function Inspection


STEP

INSPECTION

ACTION

1

  • Switch the ignition ON (engine off or on).

  • Operate the power window using the manual open/close function on the power window main switch.

  • Does the power window operate properly?

Yes

Go to the next step.

No

  • Inspect the power window main switch and the wiring harness.

  • Repair or replace malfunctioning parts.

2

  • Set the power cut switch to the UNLOCK position.

  • Operate the power window using the power window subswitch.

  • Does the power window operate properly?

Yes

Go to the next step.

No

  • Inspect the power window subswitch and the wiring harness.

  • Repair or replace malfunctioning parts.

3

  • Power-cut switch ON (with power-cut switch pressed)

  • Operate all power windows other than the driver side.

  • Does the power window operate properly?

Yes

  • Inspect the power cut switch and the wiring harness.

  • Replace the power window main switch.

No

  • Manual open/close function is normal.

  • Perform the auto open/close function inspection.


Auto Open/Close Function (Driver’s Side) Inspection


STEP

INSPECTION

ACTION

1

  • Switch the ignition ON (engine off or on).

  • Operate the power window using the auto open /close function on the power window main switch.

  • Does the power window operate properly?

Yes

Go to the next step.

No

  • If the power window automatically opens during the closing operation:

    • Go to No.6 DOOR GLASS REVERSES EVEN THOUGH THE GLASS DOES NOT ENCOUNTER A FOREIGN OBJECT WHILE IT IS MOVING UP IN AUTOMATIC MODE [POWER WINDOW SYSTEM].

  • Others:

    • Go to No.1 THE AUTO OPEN/CLOSE FUNCTION ON THE DRIVER'S SIDE POWER WINDOW IS INOPERATIVE [POWER WINDOW SYSTEM].

2

  • Operate the power window main switch to the close position while the power window is opening.

  • Does the power window operation stop?

Yes

Go to the next step.

No

Replace the power window main switch (power window control unit is malfunctioning.)

3

  • Operate the power window main switch to the open position while the power window is closing.

  • Does the power window operation stop?

Yes

  • Auto open/close function is normal.

  • Perform the IG-OFF timer function inspection.

No

  • Replace the power window main switch (power window control unit is malfunctioning.)


IG-OFF Timer Function Inspection


STEP

INSPECTION

ACTION

1

  • Close all doors.

  • Switch the ignition from ON (engine off or on) to off (LOCK).

  • Operate the power window main switch within 40 s after

    switching the ignition to LOCK position.

  • Does the power window operate?

Yes

Go to the next step.

No

  • Inspect the door switches and related wiring harness.

  • If above parts are normal, replace the power window main switch, then go to the next step.

  • If the above parts are malfunctioning repair or replace the malfunctioning part(s), then go to the next step.

2

  • Open any door.

  • Switch the ignition from ON (engine off or on) to off (LOCK).

  • Operate the power window main switch within 40 s after

    switching the ignition LOCK position.

  • Does the power window operate?

Yes

  • Inspect the door switches and related wiring harness.

  • If above parts are normal, replace the power window main switch, then go to the next step.

  • If the above parts are malfunctioning repair or replace the malfunctioning part(s), then go to the next step.

No

Go to the next step.

3

  • Close all doors.

  • Switch the ignition from ON (engine off or on) to off (LOCK).

  • Operate the power window main switch within 60 s after

    switching the ignition to LOCK position.

  • Does the power window operate?

Yes

Replace the power window main switch (power window control unit is malfunctioning.)

No

  • IG-OFF timer function operation is normal.

  • Perform the auto reverse pinch protection function inspection.


Auto Reverse Pinch Protection Function Inspection


STEP

INSPECTION

ACTION

1

  • Switch the ignition ON (engine off or on).

  • Fully open the driver’s side power window.

  • Insert a wooden hammer (thickness: 10 mm {0.39 in} or more)

    as shown below. Then, close the power window.

  • Verify that the power window opens 200 mm {7.87 in}

    after contacting the hammer and the operation stops.

  • Does auto reverse pinch protection function operate properly?

Yes

Auto reverse pinch protection function is normal.

No

Go to the next step.

2

  • Does the power window open before contacting the hammer?

Yes

Go to No.6 DOOR GLASS REVERSES EVEN THOUGH THE GLASS DOES NOT ENCOUNTER A FOREIGN OBJECT WHILE IT IS MOVING UP IN AUTOMATIC MODE [POWER WINDOW SYSTEM].

No

  • Initialize the power window main switch.

NOTE:

  • Before initializing the power window main switch, cut off the power supply to the power window main switch for 60 s

    . Then, reconnect it again after 60 s

    :

    • Disconnect the negative battery cable.

    • Disconnect the power window main switch connector.

    • Remove the fuse for the power window system.


Power Window System Initialization Procedure
NOTE: If the following operations have been performed, initial setting is reset, and auto up/down operation are disabled. Therefore, performing initial setting is necessary. ...

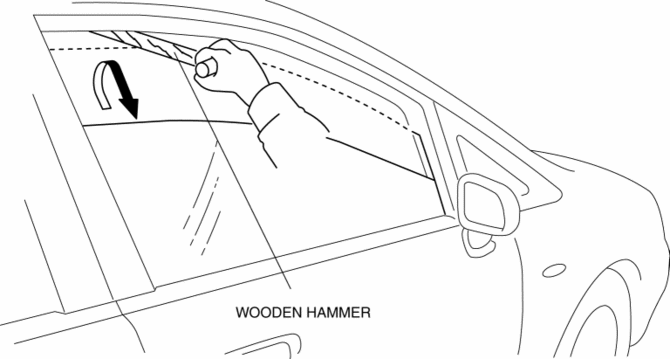
Quarter Window Glass Installation
WARNING: Using a razor with bare hands can cause injury. Always wear gloves when using a razor. CAUTION: If a door is opened or closed when all the window glass is closed, the ...

Other materials:

Refrigerant Pressure Sensor [Full Auto Air Conditioner]
Purpose The refrigerant pressure sensor detects the refrigerant pressure in the refrigerant cycle. Function The refrigerant pressure sensor converts the detected refrigerant pressure to an electric signal and sends it to the PCM. Construction The refriger ...

Front Drive Shaft (Double Offset Joint) Disassembly/Assembly
1. Disassemble in the order indicated in the table. 2. Assemble in the reverse order of disassembly. 1 Boot band (transaxle side) (See FRONT DRIVE SHAFT (TRIPOD JOINT) DISASSEMBLY/ASSEMBLY.) 2 Clip (See Clip Disassembly Note.) ...

Liftgate Upper Trim Removal/Installation
1. Take the shaded area shown in the figure, detach tab A while pulling the liftgate upper trim in the direction of the arrow (1) shown in the figure, then detach clips B, clip C and pin D while pulling in the direction of the arrow (2). 2. Take the shaded area shown in the figure, detach ...

© 2016-2024 Copyright www.mcx5.org