Mazda CX-5 Service & Repair Manual: Power Window Motor Removal/Installation
Front Power Window Motor
1. Fully lower the front door glass.
2. Disconnect the negative battery cable..
3. Remove the inner garnish..
4. Remove the front door trim..
5. Disconnect the front power window motor connector.
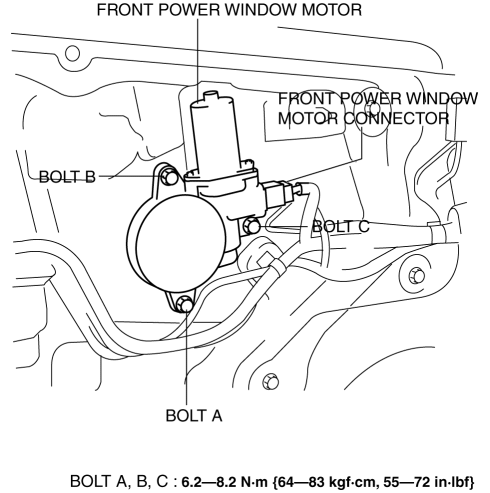
6. Remove bolt A.
7. Remove bolt B.
8. Remove bolt C.
9. Remove the front power window motor.
10. Install in the reverse order of removal.
NOTE:
-
When installing the power window motor to the power window regulator drum, the drum housing tab may come off the door unit. If this happens, remove the door speaker, insert your hand in the speaker installation hole, connect the drum housing tabs, and while supporting the drum housing, install the power window motor to the drum.
Rear Power Window Motor
1. Fully lower the rear door glass.
2. Disconnect the negative battery cable..
3. Remove the rear door trim..
4. Disconnect the rear power window motor connector.
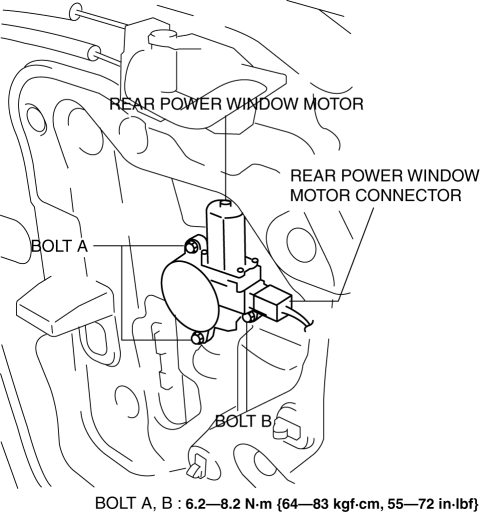
5. Remove bolts A.
6. Remove bolt B.
7. Remove the rear power window motor.
8. Install in the reverse order of removal.
NOTE:
-
When installing the power window motor to the power window regulator drum, the drum housing tab may come off the door unit. If this happens, remove the door speaker, insert your hand in the speaker installation hole, connect the drum housing tabs, and while supporting the drum housing, install the power window motor to the drum.
 Power Window Motor Inspection
Front driver side
1. Disconnect the negative battery cable..
2. Remove the inner garnish..
3. Remove the front door trim..
4. Disconnect the power window motor connector.
5. Apply battery pos ...
 Power Window Regulator
Purpose
The power window regulator moves the carrier plate up and down to open/close
the door glass using the rotation force transmitted from the power window motor.
Function
Th ...
Other materials:
Refrigerant Pressure Sensor [Full Auto Air Conditioner]
Purpose
The refrigerant pressure sensor detects the refrigerant pressure in the refrigerant
cycle.
Function
The refrigerant pressure sensor converts the detected refrigerant pressure
to an electric signal and sends it to the PCM.
Construction
The refriger ...
Air Filter
Purpose
The air filter removes pollen and dust in the intake air and purifies air
flowing into the cabin.
Function
The air filter removes pollen and dust using a dust collecting filter.
Construction
The air filter is installed to the blower unit.
It ...
Tcs/DSC Indicator Light
Purpose/Function
The TCS/DSC indicator light, built into the instrument cluster, informs the
driver of the following vehicle conditions.
TCS is operating. (Drive wheel is slipping.)
DSC is operating. (Vehicle side-slip condition.)
Roll over mitigation (RO ...
