Mazda CX-5 Service & Repair Manual: Power Window Main Switch Inspection
1. Disconnect the negative battery cable..
2. Remove the following parts:
a. Inner garnish. (driver's side).
b. Front door trim. (driver's side).
c. Power window main switch.
3. Connect the power window main switch connector.
4. Connect the negative battery cable..
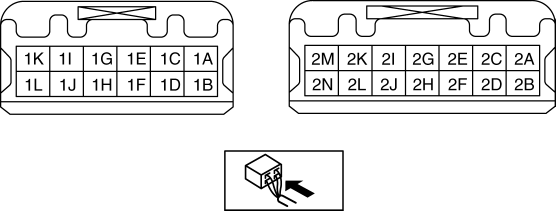
5. Measure the voltage at each terminal.
-
If the voltage is not as specified in the terminal voltage table, inspect the parts under Inspection item (s) and related wiring harnesses.
-
If the system does not work normally even though the inspection items or related wiring harnesses do not have any malfunction, replace the power window main switch.
Terminal Voltage Table (Reference)
|
Terminal |
Signal name |
Connected to |
Measurement condition |
Voltage (V) |
Inspection item (s) |
|
1A |
Rear right side window open signal |
Power window motor (rear right side) |
Door glass (rear right side) opening |
B+ |
|
|
Other |
1.0 or less |
||||
|
1B |
Passenger’s side window open signal |
Power window motor (passenger’s side) |
Door glass (passenger’s side) opening |
B+ |
|
|
Other |
1.0 or less |
||||
|
1C |
Rear right side window close signal |
Power window motor (rear right side) |
Door glass (rear right side) closing |
B+ |
|
|
Other |
1.0 or less |
||||
|
1D |
Passenger’s side window close signal |
Power window motor (passenger’s side) |
Door glass (passenger’s side) closing |
B+ |
|
|
Other |
1.0 or less |
||||
|
1E |
- |
- |
- |
- |
- |
|
1F |
Door open/close signal |
Rear body control module (RBCM) |
Any door is open |
1.0 or less |
|
|
All door is close |
approx. 6.0 |
||||
|
1G |
Rear left side window open signal |
Power window motor (rear left side) |
Door glass (rear left side) opening |
B+ |
|
|
Other |
1.0 or less |
||||
|
1H |
Driver’s side window open signal |
Power window motor (driver’s side) |
Door glass (driver’s side) opening |
B+ |
|
|
while door glass (driver’s side) is opening for approx. 40 s after ignition is switched OFF (LOCK) from ON |
B+ |
||||
|
Other |
1.0 or less |
||||
|
1I |
Rear left side window close signal |
Power window motor (rear left side) |
Door glass (rear left side) closing |
B+ |
|
|
Other |
1.0 or less |
||||
|
1J |
Driver’s side window close signal |
Power window motor (driver’s side) |
Door glass (driver’s side) closing |
B+ |
|
|
while door glass (driver’s side) is closing for approx. 40 s after ignition is switched OFF (LOCK) from ON |
B+ |
||||
|
Other |
1.0 or less |
||||
|
1K |
IG1 |
P.WINDW1 30 A fuse |
Switch the ignition ON (engine on or off) |
B+ |
|
|
1L |
Power supply |
P.WINDW2 25 A fuse |
Under any condition |
B+ |
|
|
2A |
GND |
Body ground |
Under any condition |
1.0 or less |
|
|
2B |
Sensor ground |
Power window motor (driver’s side) |
Under any condition |
1.0 or less |
|
|
2C |
Power outer mirror control signal |
Power outer mirror |
Inspect the power outer mirror switch. (See POWER OUTER MIRROR SWITCH INSPECTION.) |
||
|
2D |
Pulse 1 |
Power window motor (driver’s side) |
Door glass (driver’s side) operating |
Wave pattern. |
|
|
2E |
ACC |
MIRROR 7.5 A fuse |
Switch the ignition to ACC |
1.0 or less |
|
|
Other |
B+ |
||||
|
2F |
Pulse 2 |
Power window motor (driver’s side) |
Door glass (driver’s side) operating |
Wave pattern. |
|
|
2G |
Power outer mirror control signal |
Power outer mirror |
Inspect the power outer mirror switch. (See POWER OUTER MIRROR SWITCH INSPECTION.) |
||
|
2H |
Power outer mirror control signal |
Power outer mirror |
Inspect the power outer mirror switch. (See POWER OUTER MIRROR SWITCH INSPECTION.) |
||
|
2I |
Power outer mirror control signal |
Power outer mirror |
Inspect the power outer mirror switch. (See POWER OUTER MIRROR SWITCH INSPECTION.) |
||
|
2J |
Power outer mirror control signal |
Power outer mirror |
Inspect the power outer mirror switch. (See POWER OUTER MIRROR SWITCH INSPECTION.) |
||
|
2K |
Power outer mirror control signal |
Power outer mirror |
Inspect the power outer mirror switch. (See POWER OUTER MIRROR SWITCH INSPECTION.) |
||
|
2L |
- |
- |
- |
- |
- |
|
2M |
Door lock signal |
Rear body control module (RBCM) |
Door lock switch ON |
1.0 or less |
|
|
Other |
approx. 5.0 |
||||
|
2N |
Sensor power supply |
Power window motor (driver’s side) |
Switch the ignition ON (engine on or off) |
B+ |
|
|
Switch the ignition ACC or OFF |
1.0 or less |
||||
Inspection Using an Oscilloscope (Reference)
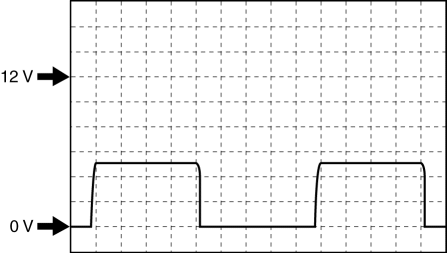
-
Terminal:
2D, 2F(+) - ground (-)
-
Oscilloscope setting: 2 V/DIV (Y), 1 ms/DIV (X), DC range
 Power Window Main Switch
Purpose
Remote control of door glass open/close and power outer mirror adjustment
are possible with occupant seated in the cabin.
Function
Power window main switch
Manual
...
 Power Window Main Switch Removal/Installation
1. Disconnect the negative battery cable..
2. Remove the cover A.
3. Insert a tape-wrapped fastener remover shown in the figure and remove the
tab B in the direction of arrow (1).
4. S ...
Other materials:
Brake/Taillight Bulb Removal/Installation
1. Disconnect the negative battery cable..
2. Insert a tape-wrapped flathead screwdriver into the service hole in the position
shown in the figure.
3. Move the flathead screwdriver in the direction of the arrow (1) shown in the
figure, pull out the service hole cover, and detach the serv ...
Front Door Key Cylinder Switch Inspection
1. Perform the front door glass preparation..
2. Disconnect the negative battery cable..
3. Remove the following parts:
a. Inner garnish.
b. Front door trim.
c. Front door key cylinder.
d. Front door glass.
e. Front door module panel.
f. Front door latch and lock actuator.
Front Do ...
Front Wheel Hub Bolt Replacement
1. Remove the brake calliper component from the steering knuckle and suspend
it out of the way using a cable.
2. Remove the disc plate.
3. Remove the wheel hub bolt using the SST as shown in the figure.
4. Place a new wheel hub bolt in the wheel hub.
5. Install the wheel hub by placi ...
