Mazda CX-5 Service & Repair Manual: Oil Seal (Differential) Replacement [Fw6 A EL, Fw6 Ax EL]
Transaxle Case Side
1. Remove the front under cover No.2..
2. Drain the ATF..
3. Disconnect the drive shaft (LH) from the transaxle..
CAUTION:
-
The oil seal is easily damaged by the sharp edges of the drive shaft splines. Do not let the splines contact the oil seal.
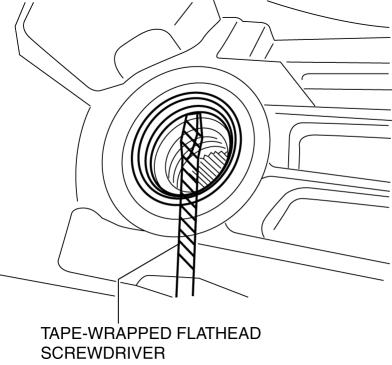
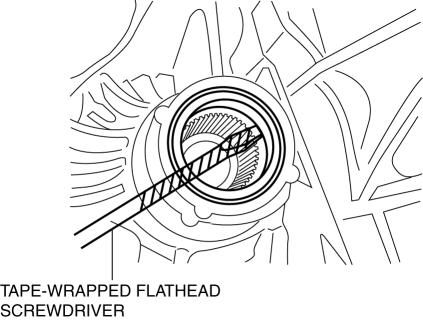
4. Remove the oil seal using a tape-wrapped flathead screwdriver.
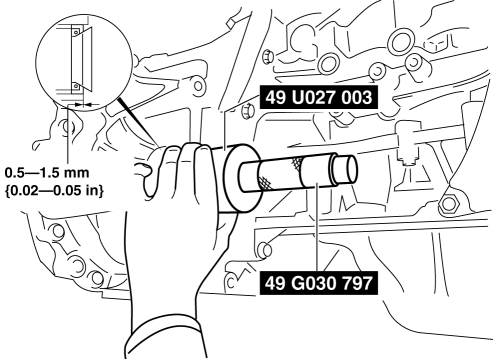
5. Using the SSTs
and a hammer, tap a new oil seal in evenly until the SST
(49 U027 003) contacts the transaxle case.

6. Coat the lip of the oil seal with ATF.
7. Install the drive shaft (LH) to the transaxle..
8. Add the ATF..
9. Install the front under cover No.2..
10. Perform the “Mechanical System Test”..
Converter housing Side (FW6A-EL)
1. Remove the front under cover No.2..
2. Drain the ATF..
3. Disconnect the drive shaft (RH)..
CAUTION:
-
The oil seal is easily damaged by the sharp edges of the drive shaft splines. Do not let the splines contact the oil seal.
4. Remove the oil seal using a tape-wrapped flathead screwdriver.
5. Using the SSTs
and a hammer, tap a new oil seal in evenly until the SST
(49 U027 003) contacts the transaxle case.

6. Coat the lip of the oil seal with ATF.
7. Install the drive shaft (RH)..
8. Add the ATF..
9. Install the front under cover No.2..
10. Perform the “Mechanical System Test”..
Converter housing Side (FW6AX-EL)
1. Remove the front under cover No.2..
2. Drain the ATF..
3. Remove the transfer..
CAUTION:
-
The oil seal is easily damaged by the sharp edges of the drive shaft splines. Do not let the splines contact the oil seal.
4. Remove the oil seal using a tape-wrapped flathead screwdriver.
5. Using the SSTs
and a hammer, tap a new oil seal in evenly until the SST
(49 U027 003) contacts the transaxle case.
6. Coat the lip of the oil seal with ATF.
7. Install the transfer..
8. Add the ATF..
9. Install the front under cover No.2..
10. Perform the “Mechanical System Test”..
 Oil Seal (Differential) Replacement [C66 M R]
1. Remove the front under cover No.2..
2. Drain the manual transaxle oil..
3. Disconnect the drive shaft (LH) from the MTX..
4. Disconnect the drive shaft (RH) from the MTX..
5. Remove the oil ...
 Oil Seal (Side Gear) Replacement
1. Remove the drain plug and the drain differential oil into a container.
2. Install a new washer and the drain plug, and tighten.
3. Remove the rear drive shaft..
4. Remove the clip from the dr ...
Other materials:
Condenser
Purpose
The condenser cools the high-temperature, highly pressurized refrigerant.
Function
The condenser cools the high-temperature, highly pressurized gaseous refrigerant
compressed by the A/C compressor using the outside air, and changes it to liquid
refrigerant.
Co ...
Master Cylinder
Purpose/Function
With the adoption of the master cylinder having an enlarged diameter (20.64
mm {0.8126 in}), brake pedal operability has been improved.
For vehicles with DSC, the diameter of the pipe between the master cylinder
and the DSC HU/CM has been increased, improving re ...
Drive By Wire Control
Outline
Calculates the optimum target throttle valve opening angle at all engine
speeds and controls the throttle valve actuator.
The drive-by-wire control is composed of the idle air control, accelerator
control, traction control, excess engine speed control, overspeed control, ...
