Mazda CX-5 Service & Repair Manual: Oil Control Valve (OCV) Inspection
Coil Resistance Inspection
1. Disconnect the negative battery cable..
2. Remove the plug hole plate..
3. Disconnect the OCV connector.
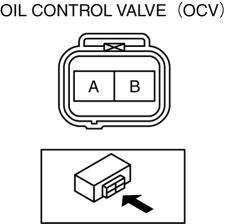
4. Measure the resistance between terminals A and B using an ohmmeter.
-
OCV coil resistance
-
6.9—7.5 ohms [20°C {68°F}]
-
If not as specified, replace the OCV..
5. Install in the reverse order of removal.
Spool Valve Operation Inspection
1. Disconnect the negative battery cable..
2. Remove the OCV..
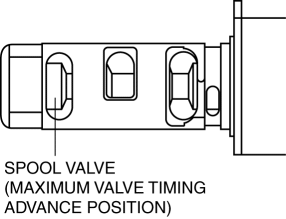
3. Verify that the spool valve in the OCV is in the maximum valve timing advance position as indicated in the figure.
-
If not as specified, replace the OCV..
4. Verify that the battery is fully charged..
-
If not as specified, recharge the battery..
NOTE:
-
When applying battery positive voltage between the OCV terminals, the connection can be either of the following:
-
Positive battery cable to terminal A, negative battery cable to terminal B
-
Positive battery cable to terminal B, negative battery cable to terminal A
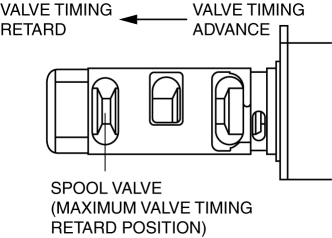
5. Apply battery positive voltage between the OCV terminals and verify that the spool valve operates and moves to the maximum valve timing retard position.
-
If not as specified, replace the OCV..
6. Stop applying battery positive voltage and verify that the spool valve returns to the maximum valve timing advance position.
-
If not as specified, replace the OCV..
7. Install the OCV..
 Lubrication System
Outline
Pressure loss is reduced by optimizing the oil passage.
With the adoption of the chain drive type oil pump, oil pump drive force
has been reduced.
With the adoption o ...
 Oil Control Valve (OCV) Removal/Installation
WARNING:
A hot engine can cause severe burns. Turn off the engine and wait until it
is cool before servicing.
1. Disconnect the negative battery cable..
2. Remove the plug hole plat ...
Other materials:
Cup Holder
WARNING
Never use a cup holder to hold hot liquids while the vehicle is moving:
Using a cup holder to hold hot liquids while the vehicle is moving is dangerous.
If the contents spill, you could be scalded.
Do not put anything other than cups or drink cans in cup holders:
Putting objects other ...
Magnet Clutch [Full Auto Air Conditioner]
Purpose
The magnetic clutch transmits the rotation force from the engine to the shaft
in the A/C compressor.
Function
The magnetic clutch engages or disengages the magnetic clutch and the A/C
turns on or off by switching the power transmission from the engine.
C ...
Turbine/Input Shaft Speed Sensor, Output Shaft Speed Sensor [Fw6 A EL, Fw6 Ax
EL]
Purpose/Function
The turbine/input shaft speed sensor detects the rotation speed of the input
shaft (low clutch drum).
The output shaft speed sensor detects the rotation speed of the output shaft
(primary gear).
The turbine/input shaft speed sensor and output shaft speed ...
