Mazda CX-5 Service & Repair Manual: Map Light Inspection
Front Map Light
1. Disconnect the negative battery cable..
2. Remove the front map light..
3. Verify that the continuity between the front map light terminals is as indicated in the table.
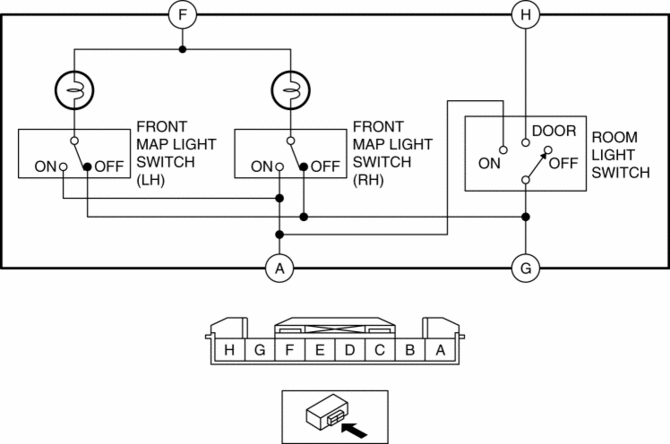

-
If not as indicated in the table, replace the front map light or front map light bulb..
Rear Map Light
1. Disconnect the negative battery cable..
2. Remove the following parts:
a. Sunroof seaming welt (vehicles with sunroof).
b. A-pillar trim.
c. Sunvisor.
d. Front scuff plate.
e. Rear scuff plate.
f. B-pillar lower trim.
g. Adjust anchor cover.
h. Upper anchor installation bolt on the seat belt.
i. B-pillar upper trim.
j. Assist handle.
k. Trunk board.
l. Trunk end trim.
m. Trunk side trim.
n. D-pillar trim.
o. C-pillar trim.
p. Headliner.
q. Rear map light.
3. Verify that the continuity between the rear map light terminals is as indicated in the table.
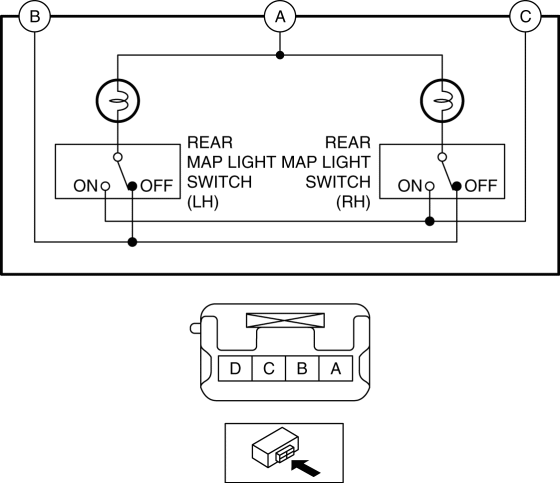
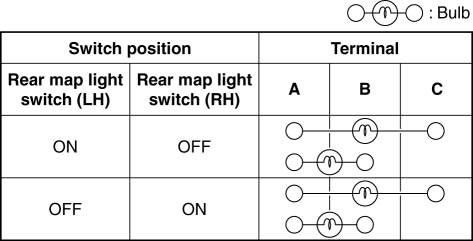
-
If not as indicated in the table, replace the rear map light.
 Map Light Bulb Removal/Installation
Front Map Light
1. Disconnect the negative battery cable..
2. To prevent scratches or damage, affix protective tape to the position shown
in the figure.
CAUTION:
If a flathead screwdriv ...
 Map Light Removal/Installation
Front Map Light
1. Disconnect the negative battery cable..
2. Open the sunglasses holder.
3. Remove the screws from the front map light.
4. Move the front map light in the direction of the ...
Other materials:
Clutch Cover Inspection [C66 M R]
1. Remove the clutch cover..
2. Perform the following procedures to inspect the clutch cover.
If it exceeds the maximum specification, replace the clutch cover..
a. Measure the wear of the diaphragm spring fingers.
Clutch cover diaphragm spring fingers maximum depth
0.6 ...
Positive Crankcase Ventilation (PCV) Valve Inspection
Airflow Inspection
1. Disconnect the section (A) of ventilation hose shown in the figure.
2. Start the engine and verify that vacuum is applied to the end of the disconnected
ventilation hose while the engine is idling.
If vacuum is not applied to the ventilation hose, perform the p ...
Front Body Straight Line Dimensions (1) [Dimensions]
Point symbol
Designation
Hole diameter or bolt or nut size mm {in}
A
Cowl panel installation hole
?5 {0.2}
B
Wiper bracket datum hole
?7 {0.3}
C
...
