Mazda CX-5 Service & Repair Manual: Lower Cowl Side Reinforcement Removal [Panel Replacement]
Symbol Mark

Removal Procedure
1. Drill the 41 locations shown in the figure.
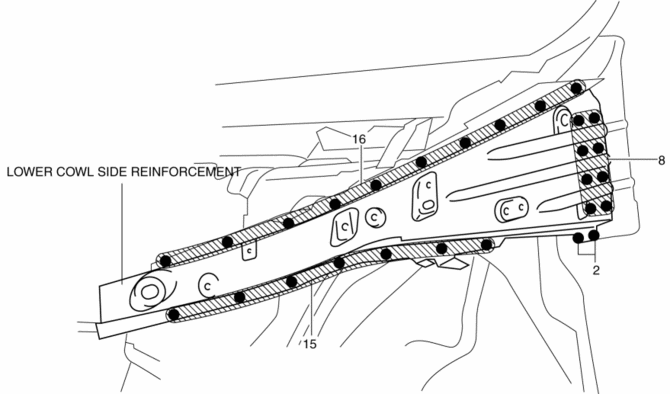
2. Remove the lower cowl side reinforcement.
 Lower Cowl Side Reinforcement Installation [Panel Replacement]
Symbol Mark
Installation Procedure
1. When installing new parts, measure and adjust the body as necessary to conform
with standard dimensions.
2. Drill holes for the plug welding before inst ...
 Mudguard Removal/Installation
1. Remove the front over fender..
2. Remove screws A.
3. Remove fasteners B.
4. Pull the mudguard in the direction of the arrow shown in the figure.
5. Install in the reverse order of ...
Other materials:
Rear Washer Hose Removal/Installation
1. Disconnect the negative battery cable..
2. Remove the front over fender..
3. Remove the mudguard (RH)..
4. Disconnect the rear washer hose A from the washer motor.
5. Remove the rear washer hose A from the washer tank hook.
6. Remove the rear washer hose A from clips A and B.
7. Disco ...
Oil Pump [Skyactiv G 2.0]
Outline
The oil pump has a mechanism for feedback control of oil pressure. As a result,
an oil pressure increase of more than the set pressure is suppressed and oil
pump drive resistance is reduced. In addition, because the set pressure can
be changed (oil pressure two-step control) ...
Driving on Uneven Road
Your vehicle's suspension and underbody can be damaged if driven on rough/uneven
roads or over speed bumps at excessive speeds. Use care and reduce speed when traveling
on rough/uneven roads or over speed bumps.
Use care not to damage the vehicle's underbody, bumpers or muffler(s) when ...
