Mazda CX-5 Service & Repair Manual: Lower Cowl Side Reinforcement Installation [Panel Replacement]
Symbol Mark

Installation Procedure
1. When installing new parts, measure and adjust the body as necessary to conform with standard dimensions.
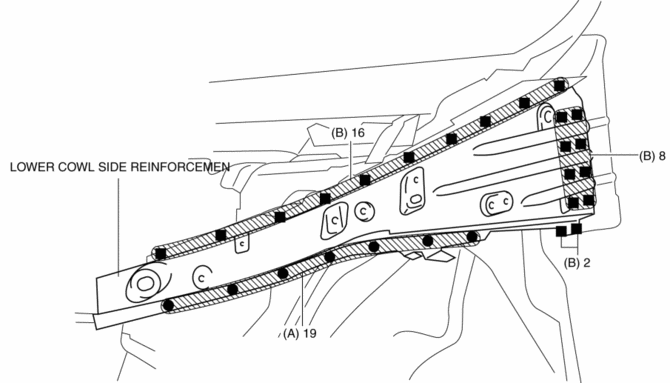
2. Drill holes for the plug welding before installing the new parts.
3. After temporarily installing new parts, make sure the related parts fit properly.
4. Spot weld the 19 locations indicated by (A) shown in the figure.
5. Plug weld the 26 locations indicated by (B) shown in the figure, then install the lower cowl side reinforcement.

 Front Under Cover No.2 Removal/Installation
1. Lift up the vehicle.
2. Remove the front under cover No.1..
3. Remove bolts A.
4. Remove fasteners B.
5. Remove the front under cover No.2.
6. Install in the reverse order of removal. ...
 Lower Cowl Side Reinforcement Removal [Panel Replacement]
Symbol Mark
Removal Procedure
1. Drill the 41 locations shown in the figure.
2. Remove the lower cowl side reinforcement. ...
Other materials:
Break-In Period
No special break-in is necessary, but a few precautions in the first 1,000 km
(600 miles) may add to the performance, economy, and life of your Mazda.
• Do not race the engine.
• Do not maintain one constant speed,
either slow or fast, for a long period of time.
• Do not drive constantl ...
Rear Sash Molding Installation
WARNING:
Using a utility knife with bare hands can cause injury. Always wear gloves
when using a utility knife.
NOTE:
Double-sided adhesive tape has already been attached to the new rear sash
molding.
1. When installing a new rear sash molding, follow the procedure ...
Clock Spring Removal/Installation [Standard Deployment Control System]
CAUTION:
If the disc on the combination switch is deformed or has foreign material
adhering to it, performance of the steering angle sensor may be reduced, causing
abnormal operation. When handling the clock spring, be careful not to deform
the disc and make sure there is no foreign ...
