Mazda CX-5 Service & Repair Manual: Low Fuel Warning Light
Purpose
-
The low fuel warning light warns the driver that the remaining fuel level is low.
Function
-
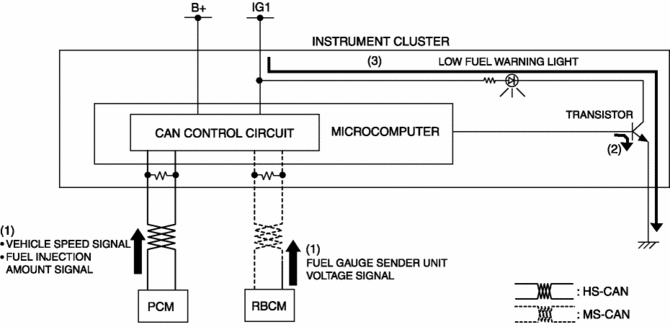
The instrument cluster calculates the fuel quantity based on the following CAN signals, and if a remaining fuel amount of approx. 10 L {2.6 US gal, 2.2 Imp gal} (fuel gauge displays remaining two segments) is detected, the low fuel warning light illuminates.
-
Fuel gauge sender unit voltage signal sent from rear body control module (RBCM)
-
Fuel injection amount signal, vehicle speed signal sent from PCM
Construction
-
The instrument cluster microcomputer controls the low fuel warning light illumination on/off based on the remaining fuel amount calculation that is calculated by the instrument cluster.
-
The low fuel warning light is set in the instrument cluster.

Operation
-
When the ignition is switched ON (engine off or on) the instrument cluster receives (1) the fuel gauge sender unit voltage signal from the rear body control module (RBCM), and the fuel injection amount signal from the PCM.
-
The instrument cluster turns the transistor on (2) if the calculated remaining fuel amount based on each signal is approx. 10 L {2.6 US gal, 2.2 Imp gal}.
-
When the transistor turns on, a ground circuit with the low fuel warning light is established and the low fuel warning light illuminates (3).
Fail-safe
-
Function not equipped.
 Low Engine Coolant Temperature Indicator Light (Blue)/High Engine Coolant Temperature
Warning Light (Red)
Low Engine Coolant Temperature Indicator Light (Blue)/High Engine Coolant Temperature
Warning Light (Red)
Purpose
Low engine coolant temperature indicator light (blue)
The low engine coolant temperature indicator light (blue) notifies the driver
that the engine coolant temperature is low and va ...
 Master Warning Light
Purpose
The master warning light warns the driver that any of the following malfunctions
is occurring.
Brake switch malfunction
Engine oil solenoid valve malfunction
...
Other materials:
Check Valve Inspection
Except U.S.A. And CANADA
1. Remove the check valve..
2. Verify that there is no airflow when positive pressure is applied to port
A.
If there is airflow, replace the check valve..
3. Verify that there is no airflow when negative pressure is applied to port
A.
If ther ...
Rear Buckle Removal/Installation
1. Switch the ignition to off.
2. Disconnect the negative battery cable and wait for 1 min or more..
3. Press the release switch, then disconnect the rear center seat belt and rear
buckle.
4. Fold down the rear seat back.
5. Remove the trunk board..
6. Remove the bolt.
7. Remo ...
Front Side Frame Removal [Panel Replacement]
Symbol Mark
Removal Procedure
1. Drill the 15 locations indicated by (A) shown in the figure.
2. Drill the 4 locations indicated by (B) shown in the figure.
NOTE:
When drilling the 4 locations indicated by (B) shown in the figure, do not
drill a hole all the way through or there ...
