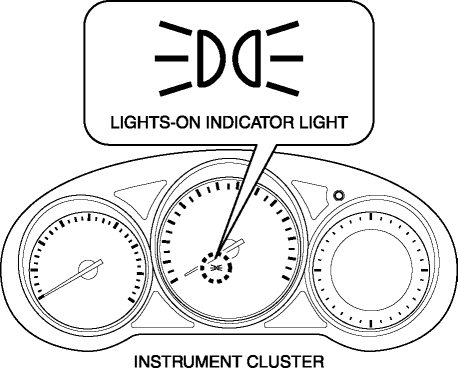
Mazda CX-5 Service & Repair Manual: Lights On Indicator Light
Purpose
-
Notifies the user that the TNS or the headlights (LO) are on.
Function
-
Illuminates when the illumination conditions for the TNS, headlights (LO), or parking lights are met.
-
When the instrument cluster receives the TNS malfunction signal sent via CAN communication from the front body control module (FBCM), the indicator flashes.
Construction
-
Displayed in the instrument cluster.
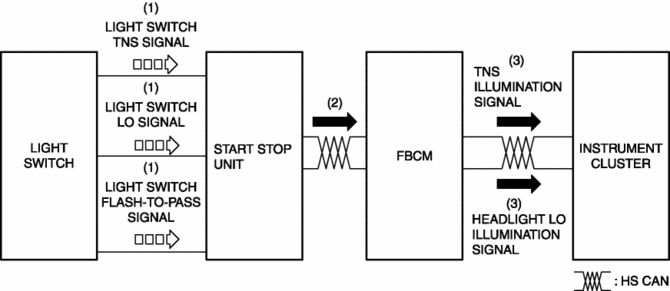
Operation
1. When the light switch is operated to the TNS, HEAD, or parking position, a light switch TNS, LO, or parking signal is sent to the start stop unit.
2. The start stop unit sends the light switch TNS, LO, or parking signal to the front body control module (FBCM).
3. The front body control module (FBCM) sends the light switch TNS, LO, or parking signal to the instrument cluster as a TNS illumination or headlight LO illumination signal.
4. When the instrument cluster receives the TNS illumination, or headlight LO illumination signal, it illuminates the lights-on indicator light.
Fail-safe
-
Function not equipped.
 Key Warning Light (Red)/Key Indicator Light (Green)
Purpose
KEY warning light (red)
The KEY warning indicator light (red) notifies the user that the engine cannot
be started, the remote transmitter is outside of the vehicle, or that there
...
 Lights On Reminder Warning Alarm
Purpose
The lights-on reminder warning alarm notifies the driver that the TNS and
headlights are not turned off.
Function
The instrument cluster receives the following vehicle c ...
Other materials:
Security Indicator Light
Purpose
Notifies the driver that the immobilizer system is operating.
Function
If a malfunction is detected in the immobilizer system, the DTC can be verified
by the flashing pattern of the security indicator light.
Construction
The security indicator light is bui ...
Glass Antenna
Purpose, Function
The RDS (Radio Data System) converts radio broadcast waves to electric signals
and sends the signals to the audio unit.
Construction
An antenna with excellent noise resistance has been adopted to the rear window
glass.
Fail-safe
Function n ...
Power Outer Mirror
Outline
The power outer mirror adjusts the outer mirror glass position up/down and
left/right using the up/down adjustment motor and, left/right adjustment motor.
The up/down adjustment motor and, left/right adjustment motor turns clockwise
(down/right direction) or counterclock ...
