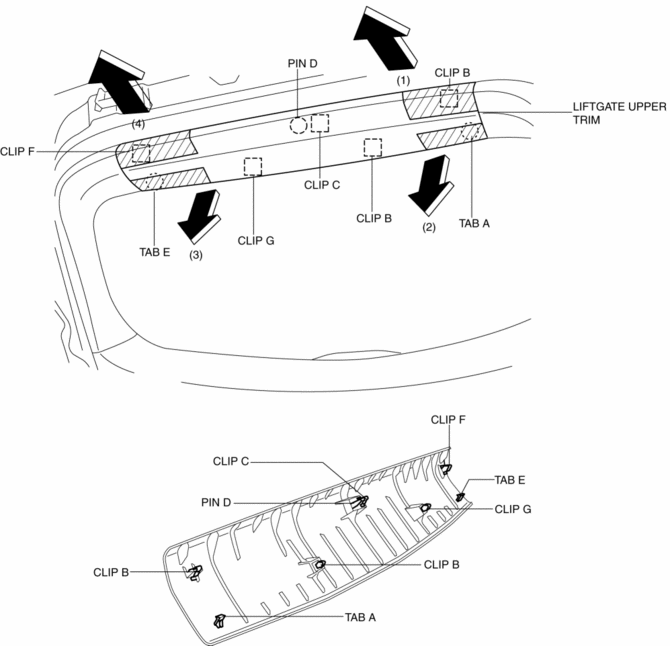
Mazda CX-5 Service & Repair Manual: Liftgate Upper Trim Removal/Installation
1. Take the shaded area shown in the figure, detach tab A while pulling the liftgate upper trim in the direction of the arrow (1) shown in the figure, then detach clips B, clip C and pin D while pulling in the direction of the arrow (2).

2. Take the shaded area shown in the figure, detach tab E while pulling the liftgate upper trim in the direction of the arrow (3) shown in the figure, then detach the clip F, clip G while pulling in the direction of the arrow (4).
3. Install in the reverse order of removal.
 Liftgate Side Trim Removal/Installation
1. Remove the liftgate upper trim..
2. Remove the fastener A.
3. Take the shaded area shown in the figure, and pull the liftgate side trim
in the direction of the arrow (1) while detaching clips ...
 Meter Hood Removal/Installation
1. Disconnect the negative battery cable..
2. Remove the upper column cover.
3. Using a phillips screwdriver, remove fasteners.
NOTE:
When pulling up the shaft of fasteners using a phill ...
Other materials:
Steering Switch
Purpose, Function
Operation of the audio system and change of the instrument cluster display
can be changed are possible without a change in driving posture.
Construction
The steering switch is located on the spoke of the steering wheel.
The resistance is built into ea ...
Steering Gear And Linkage Assembly
CAUTION:
To prevent damage to the steering gear, secure it to the vise using a copper
plate or clean cloth.
1. Assemble in the order shown in the figure.
1
Steering gear
2
Mounting rubber
(See Mounting Rubber Assembly Not ...
Ignition Coil [Skyactiv G 2.0]
Purpose, Function
The ignition coil generates high voltage by electromagnetic induction to
discharge the spark plug.
Construction
The ignition coil is installed to the upper part of the spark plug (direct
ignition coil).
With the adoption of the direct ignitio ...
