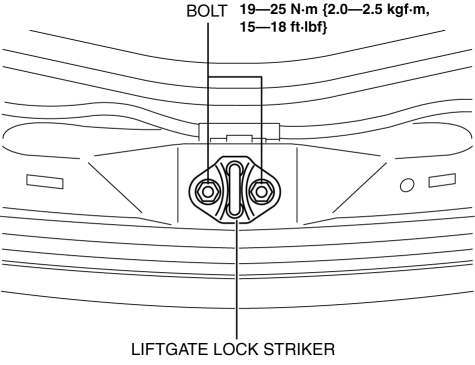
Mazda CX-5 Service & Repair Manual: Liftgate Lock Striker Removal/Installation
1. Remove the trunk end trim..
2. Remove the bolts, then remove the liftgate lock striker.

3. Install in the reverse order of removal.
4. Adjust the liftgate..
 Liftgate Light Removal/Installation
NOTE:
Fogging or condensation on the inside of the liftgate light may occur, however,
it is a natural phenomenon occurring as a result of a temperature difference
between the interior an ...
 Liftgate Lower Trim Removal/Installation
1. Remove the following parts:
a. Liftgate upper trim.
b. Liftgate side trim.
c. Liftgate recess.
2. Remove fasteners A.
3. Take the shaded area shown in the figure, and pull the liftgat ...
Other materials:
High Pressure Fuel Pump Removal/Installation
WARNING:
Fuel is very flammable liquid. If fuel spills or leaks from the pressurized
fuel system, it will cause serious injury or death and facility breakage. Fuel
can also irritate skin and eyes. To prevent this, always complete the “Fuel
Line Safety Procedure”, while referring ...
Mass Air Flow (MAF) Sensor Inspection
Visual Inspection
1. Remove the MAF sensor/IAT sensor No.1..
2. Visually inspect the MAF sensor for the following:
Damage, cracks, soiling
Rusted sensor terminal
Bent sensor terminal
If there is any malfunction, repair or replace the MAF sensor/IAT sensor
...
Battery Recharging [Skyactiv G 2.0]
Using GR8-1291:
(See GR8-1291 INSTANT TRAINING MODULE (VIDEO).)
WARNING:
Keep all flames away from the battery, otherwise evaporated gas from the
battery fluid may catch fire and cause serious injury.
1. Remove the battery filler caps and check the water level. If necessary, add
...
