Mazda CX-5 Service & Repair Manual: Liftgate Latch Switch Inspection
1. Disconnect the negative battery cable..
2. Remove the following parts:
a. Liftgate upper trim.
b. Liftgate side trim.
c. Liftgate lower trim.
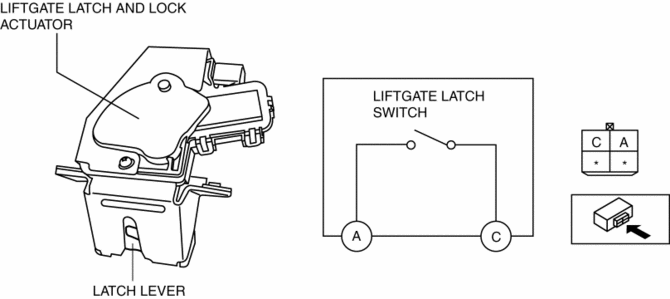
d. Liftgate latch and lock actuator.
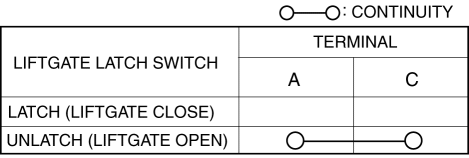
3. Verify that the continuity is as indicated in the table.
-
If not as indicated in the table, replace the liftgate latch and lock actuator.
NOTE:
-
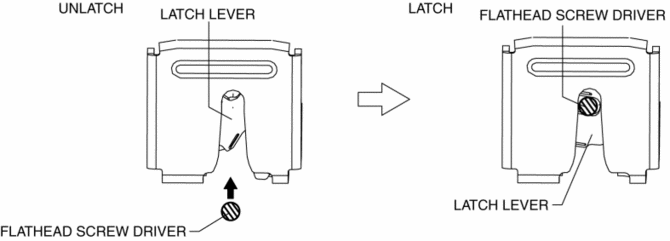
When inspecting the latch condition of the liftgate latch switch, press in the latch lever using a flathead screwdriver and set it to the latched position.
 Liftgate Latch Switch
Purpose, Function
The switch turns on/off in conjunction with the rotation of the latch lever,
and it detects the open/closed condition of the liftgate by the voltage value
which is chang ...
 Liftgate Light
Purpose
The liftgate lights are used to signal the following conditions to vehicles/people
at the rear.
Back-up lights: Signals that the vehicle is backing up.
Tailli ...
Other materials:
Control Valve Body Removal/Installation [Fw6 A EL, Fw6 Ax EL]
On-Vehicle Removal
WARNING:
A hot transaxle and ATF can cause severe burns. Turn off the engine and wait
until they are cool.
Using compressed air can cause dirt and other particles to fly out, causing
injury to the eyes. Wear protective eyeglasses whenever using compressed ai ...
Power Outer Mirror Inspection
Mirror Glass Adjustment
1. Disconnect the negative battery cable..
2. Remove the following parts:
a. Inner garnish.
b. Front door trim.
c. Power outer mirror.
3. Apply battery positive voltage and connect the ground to the power outer mirror
terminals and inspect the power outer mirror ...
Windshield Wipers and Washer
The ignition must be switched ON.
WARNING
Use only windshield washer fluid or plain water in the reservoir:
Using radiator antifreeze as washer fluid is dangerous. If sprayed on the windshield,
it will dirty the windshield, affect your visibility, and could result in an accident.
Only use wind ...
