Mazda CX-5 Service & Repair Manual: Liftgate Adjustment
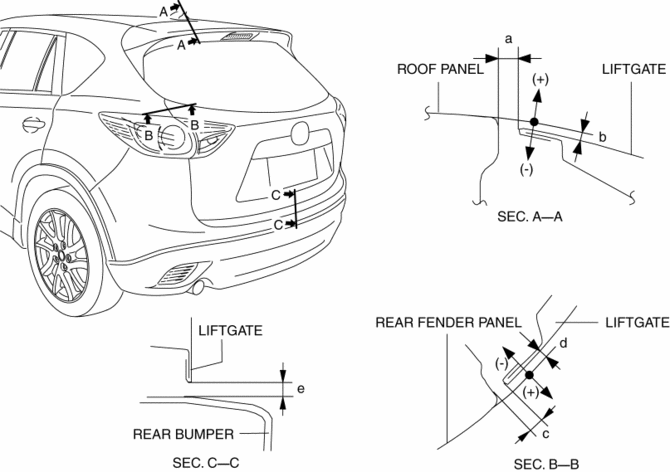
1. Measure the gap and height difference between the liftgate and the body.
2. Loosen the liftgate hinge installation bolts and adjust the liftgate.
-
Standard clearance
-
a: 5.2?7.2 mm {0.21?0.28 in}
-
b: -2.0?0 mm {-0.078?0.000 in}
-
c: 3.8?6.2 mm {0.15?0.24 in}
-
d: -1.6?0.8 mm {-0.06?0.03 in}
-
e: 3.8?7.8 mm {0.15?0.30 in}
3. Tighten the liftgate hinge installation bolts..
4. If the liftgate does not open/close smoothly, adjust it by loosening the liftgate lock striker installation screw..
5. Spray or pour water on the door and surrounding area using a hose or high pressure water pressure car wash and verify that there is no water leakage.
 Hood Removal/Installation
WARNING:
Removing the hood without supporting it could cause the hood to fall and
cause serious injury. Always perform the procedure with at least another person
to prevent the hood from ...
 Liftgate Garnish Removal/Installation
1. Disconnect the negative battery cable..
2. Remove the following parts:
a. Liftgate upper trim.
b. Liftgate side trim.
c. Liftgate recess.
d. Liftgate lower trim.
3. Disconnect the conne ...
Other materials:
Recliner Motor Inspection
WARNING:
Handling a side air bag improperly can accidentally operate (deploy) the
air bag, which may seriously injure you. Read the service warnings/cautions
in the Workshop Manual before handling the front seat (side air bag integrated)..
1. Disconnect the negative battery cable ...
Front Fog Light Bulb Removal/Installation
1. Disconnect the negative battery cable..
2. Remove the mudguard screws.
3. Disconnect the connector.
4. Rotate the front fog light bulb in the direction of the arrow (1) shown in
the figure and remove it from the front fog light in the direction of the arrow
(2) shown in the figu ...
Passenger Compartment Temperature Sensor Inspection [Full Auto Air Conditioner]
1. Measure the temperature around the passenger compartment temperature sensor
and measure the resistance between passenger compartment temperature sensor terminals
A and B.
If the characteristics of the passenger compartment temperature sensor are
not as shown in the graph, replace t ...
