Mazda CX-5 Owners Manual: Interior Lights
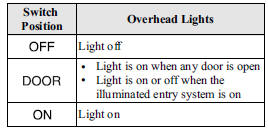
Overhead Lights
Front Map Lights
When the overhead light switch is in the door or off position, press the lens to illuminate the front map lights, and then press the lens again to turn them off.
NOTE
The front map lights will not turn off even if the lens is pressed in the following cases:
• The overhead light switch is ON.
• The overhead light switch is in the door position with the door open.
• The illuminated entry system is on.
Rear Map Lights
When the overhead light switch is in the door or off position, press the lens to illuminate the rear map light, and then press the lens again to turn it off.
NOTE
• The rear map light illuminates/turns off when you turn the overhead light switch on or off.
• The rear map light will not turn off even if the lens is pressed in the following cases:
• The overhead light switch is ON.
• The overhead light switch is in the door position with the door open.
• The illuminated entry system is on.
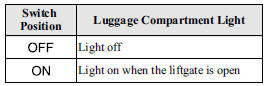
Luggage Compartment Lights
Illuminated Entry System
When the illuminated entry system operates, the overhead light (switch is in the DOOR position) turn on for:
• About 30 seconds after the driver's door is unlocked and the ignition is switched off.
• About 15 seconds after all doors are closed and the ignition is switched off.
• About 5 seconds after all doors are closed and the ignition is switched off when key is out of the vehicle.
• Illuminates for about 15 seconds when the ignition is returned from ACC to OFF.
The light also turns off when:
• The ignition is switched on and all doors are closed.
• The driver's door is locked.
NOTE
• Battery saver
If any door or the liftgate is left opened, the light goes out after about 30 minutes to save the battery.
• The operation of the illuminated entry system can be changed.
Refer to Personalization Features on .
 Sunvisors
When you need a sunvisor, lower it for use in front or swing it to the side.
Side Extension Sunvisors
The visor extender extends the sunvisor's range of sun shading.
To use, pull it out.
C ...
 Clock
Clock
The time is displayed when the ignition is switched to ACC or ON.
With Fully Automatic Type Climate Control System
With Manual Type Climate Control System
Time setting
1. Switch the ignition A ...
Other materials:
Front Console Removal/Installation
CAUTION:
Affix protective tape to the position shown in the figure.
1. Disconnect the negative battery cable..
2. Remove the following parts:
a. Decoration panel.
b. Shift lever knob (MTX).
c. Front console box.
d. Shift panel.
e. Upper panel.
f. Rear console.
g. ...
Front Suspension
Outline
A strut type front suspension has been adopted.
The connection area of the front crossmember and body is a 6-point rigid
mount type.
The cross-section on the center member of the front crossmember has been
expanded and the longitudinal offset of the ...
Tires
For reasons of proper performance, safety, and better fuel economy, always maintain
recommended tire inflation pressures and stay within the recommended load limits
and weight distribution.
WARNING
Using Different Tire Types:
Driving your vehicle with different types of tires is dangerous. It ...
